Pages

Tuesday, 30 April 2013

DIY McBreakfast: Homemade Sausage and Egg Breakfast Muffins

I've been blogging now for eight months, and I can honestly say I love everything about what I do on this site, from experimenting to sharing tried and tested recipes, setting myself challenges to reviewing new products. I go to sleep thinking of new recipe ideas, and I can't wait to finish work at night so I can fire up the laptop and check my messages. But the biggest thing to come out of my blogging has been discovering that I cannot help competing with every major food supplier out there. I simply cannot walk down a supermarket aisle, or eat out, without starting to think... "I could make that." And Gary doesn't help, in fact the opposite, he knows me so well, and he deliberately goads me "Oh you couldn't possibly make chocolate eclairs..." he says, knowing full well that once he's said it I won't rest until I've proved him wrong! Which is exactly what happened when we were sat watching TV the other night, and an advert for a well known fast food chains breakfast menu came on...

Let me tell you, when that well known fast food chain took it upon themselves to take an English muffin, and fill it with sausage meat, egg and cheese, they were really onto something, and as always, homemade is soooooo much better than takeaway. Making these at home, you get light fluffy muffins, freshly made sausage patties, and whilst I couldn't possibly tell you that this is a healthy morning meal, at least you know exactly what has gone into it, and you get to eat it hot from the pan, rather than after it has been sat on the side for 20 minutes bathing in its own grease!
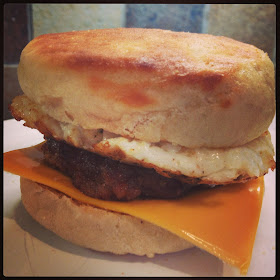
Homemade Sausage and Egg Breakfast Muffin

The quantities listed here make 5-6 English muffins, which will keep for up to 2 days if placed in an airtight container.

To make the English Muffins;

7 grams fast action yeast
125 ml tepid water
75 grams natural yoghurt
225 grams strong white bread flour
1/2 teaspoon salt
handful of semolina


  • In a medium sized bowl, dissolve the yeast in about half of the water. Add the remaining water and the natural yoghurt, and mix well until smooth and combined. 
  • Sift the flour into a large mixing bowl, add the salt and quickly stir. 
  • Pour the liquid mixture into the flour, and mix together to make a dough.
  • Turn out onto a lightly floured surface, and knead well for 5 - 10 minutes until a smooth pliable dough is formed. Return the dough to the bowl, cover and leave to prove for 1 hour, or until doubled in size. 
  • Turn the dough back out on the surface, and knead quickly to knock back. Roll the dough out to about 2 cm thick, and cut out rounds about 3 inches wide. Knead the offcuts back together, re-roll and continue to cut out rounds until all the dough has been used. 
  • Place the rounds on a lightly floured baking tray, sprinkle the semolina over the tops, cover, and leave again to rise for about 40 minutes.
  • Heat a little oil in a large frying pan. Place the muffins in the pan, and cook for about 7 minutes on both sides. Keep the heat down low so as not to burn the outside of the muffins before the inside cooks. 
  • Set aside to cool. These muffins can be kept for a couple of days in an airtight container, just halve and toast and they are ready to eat. 
Muffins, English Muffins, McMuffins
Freshly cooked English Muffins


To make into Sausage and Egg Muffins;

50g sausage meat per patty
1 teaspoon bread crumbs per patty
salt and pepper to taste

eggs
sliced cheese


  • To make the sausage patties, mix the sausage meat well with the breadcrumbs and salt and pepper. transfer the mixture onto a well floured surface, and roll out to around 5mm thick. Cut into 3 inch rounds. 
  • Coat both sides of the rounds with the flour, and fry in a hot pan with a little oil, for about 4-5 minutes on both sides. (You can make the patties up to 24 hours in advance, just wrap individually in clingflim once coated in flour and keep in the fridge).
  • Once the sausage patties are cooked, set aside to keep warm. 
  • Take the muffins, and slice in half. Place under a grill or in a toaster to toast. 
  • Fry the eggs, turning over halfway through so that yolk cooks through entirely. 
  • To assemble, layer up the bottom of the muffin, add a slice of cheese, the sausage patty, and the egg.
  • Finally, place the top half of the muffin on, and there you have your very own DIY McBreakfast!


The main thing I noticed when we bit into these is how savoury they tasted compared to the ones from the fast food chain. There must be a huge amount of sugars added to the muffins and the sausage meat in their version!

I am entering this recipe into Made with Love Mondays run by Javelin Warrior at Cookin w/ Luv as a great example of making a well known meal at home, and totally from scratch!


Friday, 26 April 2013

Product Review: Paper Themes Personalised Cupcake Wrappers

This week I was sent a few of these gorgeous looking cupcake wrappers to review by Paper Themes. I was really excited to receive the samples for these, as I have agreed to bake wedding cupcakes for two of my close friends this year, so have been researching a inordinate amount of wedding cupcake related paraphernalia over the last few months, but I hadn't come across personalised wrapper yet. 

Doing a little pre-review research, I googled Paper Themes and learned that they are primarily a wedding stationery business, based in Shipley in Yorkshire. Not only that, but they have been in the wedding stationery industry for over 100 years! I'm a big fan of supporting British business wherever possible, and I was really pleased to see that all the design and production of their products comes straight out of Yorkshire. The other thing that really struck me as I surfed their website was that for a company that is over 100 years old, they have done a fantastic job of keeping up with the times. Their website is fresh, their online shop is slick and easy to use, and the products themselves are wonderfully reflective of current trends and fashions, with a strong vintage influence, and trends such as 'Keep Calm and Eat Cake', and 'OMG' featuring in some designs. Their full range has expanded out from wedding invitations and stationery, and there are some real gems on here such as Lottery Ticket Holders, Personalise Table Plans, and Bunting. 


The wrappers came flat in the post, and have a tab and slot to assemble. Nice and easy so far! My first observation was the thickness of the card that the wrappers are made from. The board is really nice and thick, and has a great texture to it, there were a combination of matt and gloss finishes. It is obvious that the company is first and foremost a stationery company by the quality of the board that they are using. In addition, the cut of the wrappers is flawless, there are no rough edges, and the printing is clear and sharp in focus (unlike my photography...) 


To assemble the wrapper, simply bend the wrapper round into shape, and slide the tab into the pre-cut slot, as shown below...


I have to be honest and say that one of the wrappers I was sent refused to hold together by itself, however I was able to fix this easily by fixing a small square of sellotape on the inside to hold the tab in place. 

Once the wrappers are assembled, the idea is to use a cupcake that has already been baked in a standard cupcake case. The wrappers will completely cover the case, so there would be no clash of colour if you were unable to get cases that matched the scheme of the wedding. Take a baked and decorated cupcake, and drop it into the wrapper, and voila! 


All together, there are currently 18 different designs of these wrappers available, to see the full range you can visit the site here. The wrappers are priced at £12.99 for 24, which for the quality and the personalised element I think is reasonable, and they would certainly add a great personal touch to a wedding or other special occasion such as a milestone anniversary. 

Disclaimer: This is a sponsored post, however I was asked to be honest in my review, and all thoughts and opinions expressed here are my own. 

Thursday, 25 April 2013

How To Make The Perfect Buttercream Frosting

Buttercream is a perfect accessory to any cake or bake, due to it's versatility when it comes to colouring and flavouring it. There are several variations of buttercream, from a simple butter and sugar mix, to the more complex and delicate meringue based buttercreams, which use various methods of mixing beaten egg whites with sugar or sugar syrup, then beating in the butter. These are known as Italian, Swiss and French meringue buttercreams, and each has a slightly different preparation method to create a slightly different taste and texture. 

This post however is about the most commonly found buttercream recipe in English dishes. It is made up of butter and icing sugar, generally in a 1:2 parts ratio, and can be used to decorate cupcakes, fill and cover cakes, or form the integral layer between a cake and its fondant covering. The recipe is simple enough, but I believe there is a knack to the preparation of buttercream in order to turn it from sickly sweet butter, into a smooth, light, creamy cake topping. A smooth, well prepared buttercream will be easy to pipe, without leaving raggedy edges and air bubbles. 

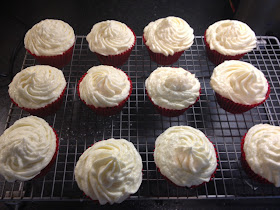
Vanilla Cupcakes with a pure Vanilla Buttercream

The ingredients here make enough buttercream to top six large cupcakes, or fill and top an eight inch cake. The basic ratio is one part butter to two parts icing sugar, so you can multiply up these quantities as much as you need to for your bake. 

Ingredients

100 grams good quality unsalted butter
200 grams icing sugar
a little milk

Variations

Buttercream can be coloured and/ or flavoured to suit the overall look and taste of your cakes and cupcakes. 

A selection of cakes and cupcakes I have decorated with buttercream

Flavouring your buttercream should be done around halfway through the process. You can add a dash of an extract, such as vanilla, rose water, peppermint, or lavender. For a more citrus flavour, grate the zest of an orange, lemon or lime into the mixture, or for a chocolate buttercream, swap out some of the icing sugar for a high quality cocoa powder such as Green and Blacks. You can flavour buttercream even with liquids, such as champagne or coffee. The important thing to remember if you are adding a liquid is to increase the quantity of icing sugar by double the volume of the liquid, so as not to alter the final consistency, and to incorporate them gently so as not to curdle or split the buttercream. 

Equally you can colour buttercream in any shade you should wish. It will naturally be a slightly off-white colour, however if you prepare it well, it will be as good as white to the eye. When using food colouring, always try to use a gel based colour, as they will not alter the consistency of your buttercream. If you do use a liquid food colour, remember to add an extra tablespoon of icing sugar to balance out the additional liquid. 

Method

Sift the icing sugar well into a bowl and set aside. 

In a large mixing bowl, add the butter roughly chopped into several chunks. Use a good quality unsalted butter here, as you will get a far superior flavour to using a spread containing vegetable oils. I always cook with salted butter, however to keep the lightness use unsalted here, plus you don't get the salt taste interfering with any additional flavour you add. I always use Lurpak for my buttercream, as I trust the taste, and it's lighter colour allows you to get an almost white buttercream. 


Now, take a hand whisk, and beat the butter for a minute...


...and another minute - can you see it getting lighter in colour? ...


...and one more - it should now have the appearance of whipped double cream, and be almost white...


Now we start to add the icing sugar. Retrieve the bowl of sifted icing sugar you set aside earlier. Now add the icing sugar two tablespoons at a time. Any more than this, and you will be engulfed in a white cloud of sugar as soon as you turn your whisk on!


Keep going now, adding a couple of tablespoons of icing sugar, beating until combined, and then adding a little more. About halfway through the icing sugar, add your flavouring if you are using one, this makes sure it gets fully combined through the buttercream.


Continue with the icing sugar until it has all been used. As you add more and more sugar, the mixture will start to thicken and get stiffer. By the time you have added all the icing sugar, the mixture may have formed a texture similar in appearance to scrambled eggs...


... carefully add a teaspoon of milk, and beat well. This is usually enough to bring the mixture back to the perfect piping consistency. If needed, add a second teaspoon of milk, but be careful as too much and the mixture may start to curdle. Your buttercream should now look like this...


If you are adding a colour to the buttercream, do it at this stage. Any earlier, and you risk diluting the colour as you add more icing sugar. Adding the colour to the finished product allows you to get exactly the right shade for your cake or cupcakes. 

Now you are ready to ice your cake. If you are planning to pipe the buttercream, prepare your piping bag and tip. Open the top of the bag wide, and fold over a good third of the bag. Use a mug or jug as a holder for your bag so you still have the use of both hands. 


Spoon the buttercream into the bag one spoonful at a time, each time, push the buttercream down into the bag, and use the side to scrape the spoon clean. Try to keep pushing more buttercream down into the bag to avoid creating any pockets of air in the bag that will affect the flow when piping. 


And now you are ready to pipe! Enjoy!


Friday, 19 April 2013

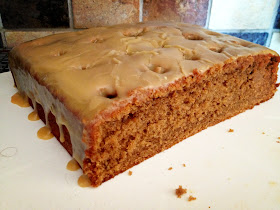
Caramel Latte Cake

I've been meaning to make a coffee cake for a few weeks now, but have been putting it off, because, if I'm honest, they never live up in reality to the image in my mind. I like my cakes moist and packed with flavour, and I tend to find coffee cakes dry, and monotone in taste - I guess I've just never found the right recipe. So I was quite excited when, in the middle of an insomnia fuelled sleepless night last week, I came up with this gem of an idea, and when it came out of the oven even better than I had hoped, I just had to share it with you all... 

Caramel Latte Cake
Caramel Latte Cake... tastes just like a Caramel Latte!

This cake isn't the most polished or fancy to look at, and I did toy with the idea of adding an additional layer of frosting to cover the 'poke-holes' however I decided that it would unbalance the flavours, which are just perfect as they are. It is based on my favourite coffee-based drink, the sweet, creamy Caramel Latte, and it captures all of the taste of one of those heavenly drinks in a beautiful slice-able form. This is a cake to eat, not just look at!

The stroke of genius in this recipe is switching out the majority of the sugar for condensed milk, which adds a more gentle sweetness to the cake, and produces a moister, creamier texture to the sponge - this is definitely something that I will be trying again in future recipes. I had also seen a few American posts about 'poke' cakes, where you make deep holes in the sponge to absorb the moistness of the frosting all the way through the cake, so decided to employ this tactic to this bake as well.

Ingredients;

For the Cake...

175 grams unsalted butter
50 grams caster sugar
3 eggs
200 grams condensed milk
2 tablespoons instant coffee
1 tablespoon Tia Maria or coffee based liquor
1 tablespoon water
200 grams self raising flour
1 teaspoon baking powder

For the Caramel topping...

160 grams condensed milk
80 grams butter
80 grams caster sugar
2 tablespoons Tia Maria or coffee based liquor

Pre-heat the oven to 180 degrees, and line an 8 inch square cake tin with baking paper. The baking paper is essential to this bake, to allow you to be able to easily remove the cake from the tin once the caramel has cooled.


Take a large mixing bowl, and beat the butter until soft and creamy. Add the caster sugar, and cream together for a minute. Add the eggs, and the condensed milk, and whisk together to form a creamy batter.


In a small bowl or cup, dissolve the instant coffee in the water and Tia Maria (if you don't want to use the liquor, use two tablespoons of water instead). Gradually add this to the mixture and beat well until combined.


Add the flour and baking powder, fold well into the mixture, then transfer the batter to the prepared cake tin. Spread it evenly to each of the sides of the tin to ensure an even rise.


Place the cake in the oven to bake for around 30 minutes, or until the sponge is firm, and an inserted skewer comes out clean. Meanwhile, whilst the cake is baking, make the caramel topping. Put the condensed milk, butter and sugar in a saucepan, and the Tia Maria if desired, and place on a low heat.


Heat gently until the butter is melted and the sugar dissolved, then bring to the boil, stirring continuously, until the mixture turns a pale brown colour. Take off the heat and set aside.


As soon as the cake is removed from the oven, and still in its tin, take a wooden spoon, and using the handle, make a series of holes in the cake, pushing the handle right down to the bottom of the tin. Space the holes about an inch apart.


Pour the warm caramel mixture over the cake, making sure that it runs into the holes made. Spread the caramel evenly over the surface, and place on a cooling rack, leaving the cake to cool completely in the tin.


Once cool, use the edges of the baking paper to lift the cake from the tin, then remove.

This cake is moist from the extra liquid in the condensed milk, and gooey from the caramel running through the whole cake via the poke holes. The sponge is delicate, and not overly sweet as there isn't a lot of sugar in the cake batter, which sits well with the sweetness of the caramel frosting. It absolutely tastes like a caramel latte from your favourite coffee shop chain!


Wednesday, 17 April 2013

Soda Bread, Welsh Rarebit and Episode Five of 'Bread'

For the last five weeks, I have dedicated most of my baking time to mastering the right techniques for baking bread, as it was a skill I felt I was lacking. My mission coincided with the start of Paul Hollywood's new TV series 'Bread', and each week I have reviewed the episode, and attempted to bake at least one of the loaves featured, with varying results! I am skipping an episode in my write ups here, as episode four covered sourdoughs, and work commitments have prevented me from starting to grow my starter culture, however rest assured when I get back from Belgium this weekend this will be the second thing to do on my list (after giving Gary a big hug of course!).

So, brushing past sourdoughs for now, episode five of the show was dedicated to soda breads, known by bakers it seems as 'the easiest of the breads'. The main thing to know about soda breads is that they vary from most other forms of bread due to the fact that they don't contain any yeast, the raising agent instead being bicarbonate of soda - hence the name. The magic occurs within soda bread due to the combination of lactic acid, found in buttermilk, and the soda reacting to form carbon dioxide, which in turn creates the bubbles that texture the loaf. This chemical reaction is instantaneous, which negates the need to knead and prove the dough as with yeast-based breads, therefore soda bread is a great option for when time is short. 

Soda Bread
Soda Bread

As with previous episodes, I have used Paul Hollywood's recipe, however this week for a couple of reasons I have had to make a few substitutions. Mostly this was down to not being able to purchase the correct ingredients in my local supermarket, and as I fear this may be a common problem depending on where you live and/or shop, I am going to share my amended version of the recipe, to show you how substitutions can be made. If you want Paul's original recipe you can find it here

The two main changes I made here were substitutions for not being able to find either plain wholemeal flour, or buttermilk in the supermarket. To compensate for the plain wholemeal, I used a self raising wholemeal flour, and halved the amount of bicarb of soda, as the SR flour already contains a rising agent. To compensate for not having buttermilk, I mixed normal milk with sour cream and a little lemon juice, which together creates the same properties as buttermilk. Here's my version of the soda bread recipe;

Ingredients

250 grams plain flour
250 grams wholemeal self raising flour
1 teaspoon salt
1/2 teaspoon bicarbonate of soda
150 ml sour cream
270 ml semi-skimmed milk
1 teaspoon lemon juice

Method

Pre-heat the oven to 200 degrees, and line a baking tray with greaseproof paper. In a large mixing bowl, sift both the flours together, add the salt and the bicarb of soda, and combine. In a jug, mix together the milk, sour cream and lemon juice together and set aside for a few minutes. Then, gradually add the fluids to the flour mix, stirring with a wooden spoon, to form a dough. Tip the dough out onto a floured surface, and bring the dough together into a ball without kneading it as this will prevent the bicarb from doing it's thing. 

Shape the dough into a ball, and then pat it down to form a flat-ish round. Transfer onto the lined baking tray, and using a sharp knife cut into four sections. Leave the four sections in one full round, as they will join together as the loaf bakes. 


Bake in the oven for 30 minutes, until golden in colour, and hollow sounding when tapped on the base. I checked my loaf a little too early here, and one of my sections broke off as I moved it, as the dough was still sticky in the centre. Once the loaf is cooked, remove from the oven and transfer to a cooling rack to cool. 


Taking inspiration from Monday's episode of 'Bread' I decided to turn my first ever loaf of soda bread into a Welsh Rarebit for our lunch. I started again with Paul's recipe as a base, but made a few adjustments based on ingredients and our own tastes. Paul's recipe is here, or mine is below... (pick mine!) 

Welsh Rarebit
Ingredients

120 ml semi-skimmed milk
1 tablespoon plain flour
200 grams grated mature cheddar
1 teaspoon mustard powder
1 teaspoon worcestershire sauce
90 grams bread crumb (roughly two slices)
1 egg yolk

Method

Heat the milk in a saucepan until it starts to boil. Add the flour and whisk well, making sure there are no lumps of flour in the mixture. Continue to whisk over the heat until the mixture starts to thicken a little. Add the grated cheese, and again whisk in, until the cheese has melted and forms a sauce. Add the mustard powder and the worcestershire sauce, and stir well. Add the breadcrumbs, and mix in thoroughly, the mixture will start to thicken to a paste, and will ball up in the pan. Transfer the mixture to a bowl, and set aside.

Cut slices from the soda bread loaf, and place under a grill to toast one side. Whilst the bread is toasting, take the cheese mixture, add the egg yolk and beat together.

Remove the bread from under the grill, turn each slice over, and spread the cheese mixture thickly over each piece. Return to the grill, and cook for 4-5 minutes until the mixture is bubbling and starting to colour. Remove, and serve hot. 


I am entering this post into this week's Made with Love Monday feature hosted over at Made w/ Luv by Javelin Warrior, as the whole meal was made totally from scratch, including the bread. 

Tuesday, 16 April 2013

Black Forest Cupcakes

I'm off to Brussels for a few days for work this week, which means three bake-free days (boo) and a lot of networking (boo again). In the interest of making sure that Gary doesn't suffer too much from cake-withdrawal in my absence, I offered to bake him something to keep his sugar levels up, to which he replied that he wanted a Black Forest Gateaux. After explaining that this might not be the best bake, considering the fresh cream would prevent it from keeping well, we compromised on a "black forest flavoured" alternative. Basically, as long as it had cherries and chocolate I was onto a winner! 

Black Forest Gateaux, Cupcake, Cherry, Cherries, Grenadine
Black Forest Cupcake

I started with my absolute go-to chocolate cake recipe as a base for these cupcakes, and started to raid the cupboards for additions to make up the Black Forest elements. The flavourings here might be a little unconventional for any fresh cream and cherry purists out there, but I can promise that this recipe makes 12 sweet, fruity and yet chocolaty, perfect little cupcakes.

I have used maraschino, or glace cherries in this recipe over fresh ones, firstly because that happens to be what I had to hand, but secondly as I wanted the sweetness of the cherry syrup to cut through my dense rich chocolate cake. I have further enhanced the fruit flavour by adding Grenadine, a non-alcoholic fruit flavoured syrup mostly used in cocktails. Whilst not necessarily made from cherries, (my bottle has raspberries and strawberries on the label, although traditionally Grenadine is made from pomegranate or blackcurrants) the sweet syrup complements the flavours of the maraschino cherries and works well in these cupcakes. You could omit the Grenadine from this recipe if you didn't have any, and use the syrup from the jar of maraschino cherries instead. 


Ingredients:

For the cupcakes;

50 grams dark muscovado sugar
25 grams good quality cocoa powder (I use Green and Black's)
125 ml boiling water
1 tablespoon Grenadine
65 grams unsalted butter
75 grams caster sugar
1 egg
1/2 teaspoon vanilla extract
115 grams plain flour
1/2 teaspoon baking powder
1/2 teaspoon bicarb of soda
12 maraschino cherries

For the vanilla buttercream frosting;

250 grams unsalted good quality butter
500 grams icing sugar
1/2 teaspoon vanilla extract
2 tablespoons milk

To decorate;

cocoa powder
12 maraschino cherries
Grenadine

Method:

Sift the cocoa powder into a mixing bowl, and add the dark muscovado sugar. Pour over the boiling water, and whisk to form a syrup. Add the tablespoon of Grenadine, mix again, and set aside. 

In a large bowl, beat the butter until creamy, then add the caster sugar and beat again until light and fluffy. Add the egg and the vanilla extract, and mix well. Gradually pour in the cocoa mixture, whisking continuously, and stir until all the ingredients are well combined. Use a spatula, and make sure there is no butter left on the bottom of the bowl. 

In a separate bowl, sift the flour, and add the baking powder and bicarb of soda. Mix well. Add the flour mixture to the batter, and fold in. You will have quite a loose runny mixture once it is all combined. 

Divide the mixture between 12 cupcake cases. Take the 12 maraschino cherries, and chop each one roughly into quarters, sprinkling the pieces across the top of each of the cupcakes. 


Bake the cakes at 180 degrees for 12 - 15 minutes, until they are springy to the touch. Remove from the oven, and cool completely on a cooling rack. 


To make the buttercream frosting, beat the butter in a large bowl until creamy, then gradually add the icing sugar, a little at a time. Add the vanilla extract and the milk around halfway through, then continue until all the icing sugar has been incorporated. The mixture should have a whipped cream-like consistency. 

Finally, to decorate the cupcakes when cool, transfer the buttercream to a piping bag, and pipe swirls onto of each of the cupcakes.


Dust the top of each with a little cocoa powder, place a whole maraschino cherry on the top, and drizzle a little of the Grenadine over. (I did this by pouring a bit at a time into a 1/4 teaspoon measure and then drizzling from there in order to not pour too much at once). 


The finished cupcakes are rich and chocolaty on the bottom, with a hint of cherry, and then topped with a light buttercream, and a sweet drizzle of fruit from the Grenadine running through... mmmm...


I am entering these cupcakes into this month's Tea Time Treats, hosted by Lavender and Lovage, and What Kate Baked, where the theme this month is Fairy Cakes, Cupcakes and Muffins


Friday, 12 April 2013

Cheese and Tomato filled Bread Rolls

I have a lot of work to be doing, a lot of blog posts to finish, some guest articles to write, and a few cakes to plan and prep for. I should absolutely, definitely not be making cheese filled bread rolls... So, here are my cheese filled bread rolls!

Cheese and Sun-dried Tomato filled Rolls

I hadn't made any bread yet this week, and I'm going to be honest, I've been missing it a little bit! After studiously watching 'Bread' for the last three weeks, and then attempting to recreate the loaves each week, I feel like I'm about to hit a stumbling block in the shape of sourdough starters! Watching the latest episode, the process of create the starter, feeding it, allowing it to grow for a week, is somewhat daunting, and I'm not even going to try and attempt it until the weekend. 

Meanwhile however today, I decided to get a little bit creative with some dough. I have seen a few recipes out there for these tasty looking filled rolls, it seems to be something of a trend at the moment to bake fillings into bread, creating flavoursome ready to eat sandwiches. I love the concept, it's basically lunch on the run, no slicing or buttering required! 


Using what I could find in the house, here's how I made them...

Ingredients

For the dough;
- 580 grams strong bread flour
- 5 grams salt
- 7 grams yeast
- 100 ml olive oil
- 300 ml warm water
- 1 egg, beaten
- handful of sesame seeds

For the filling;
Anything you want!!!! I used 100g cheddar cut into cubes, some chopped sun-dried tomatoes and a sprinkle of rosemary, but you could use any cheeses, cooked meats, vegetables and herbs you wanted. 

Method
  • Sieve the flour into a large mixing bowl, add the salt, and mix well. 
  • Add the yeast to the warm water and stir. 
  • Pour the olive oil over the flour. Add a third of the water and yeast mixture, and start to mix the dough together. 
  • Add another third of the water, mix again, and then as much more of the water as needed to bring the dough together.
  • Turn the dough out onto an oiled work surface, and knead for around 5 minutes, until smooth and elastic.
  • Place the dough into an oiled bowl, cover with clingfilm, and put in a warm place for at least an hour, or until the dough has doubled in size. 
  • Meanwhile, prepare your filling, by chopping all of the ingredients and mixing together in a bowl. 
  • Once the dough has proved, tip it back out of the bowl, and knock it back by kneading it for a couple of minutes.
  • Divide the dough into eight equal parts, and cover with clingfilm to keep the dough from developing a crust. 
  • Take each of the eight pieces in turn, roll them up into a ball, then pat down to make a flat round. Place some of the filling in the centre of the dough, then fold the edges up into the centre to seal the filling inside. Turn the rolled up dough over, and place on a greased baking tray, with the seam on the bottom. 
  • Repeat with all eight pieces, then cover with the clingfilm, and place the tray into a large plastic bag, ensuring no air can get to the dough. 
  • Set aside for a further 45 minutes to prove again.
  • Meanwhile, pre-heat the oven to 180 degrees. 
  • Once the second prove is completed, remove the plastic bag and the clingfilm. Brush the tops of the rolls with the beaten egg, and then sprinkle the sesame seeds over the buns.
  • Place in the oven, and bake for 15 - 20 minutes, until golden brown, and the rolls make a hollow sound when tapped lightly on the base.
  • Remove from the oven, and serve hot, or leave to cool and take them for your lunch, it's your choice! 


Thursday, 11 April 2013

Book Review: 'Freeze' by Justine Pattison

When I agreed to review 'Freeze', I'm not entirely sure what I was expecting. A cookbook dedicated to freezer friendly recipes, obviously, but this filled my mind with images of 1970's cooking, casseroles, stews, and awful vol-au-vents. I remember dusty tombs of freezer recipes in my Mum's cookbook collection, and in the age of super-foods, organic produce, and multi-cultural cuisines, I feared that freezer cooking was a thing of the past.

'Freeze' by Justine Pattison

My first thumb through 'Freeze' immediately put my mind at rest. When I pick up a recipe book, I always leaf through the pages first, eager to see which pictures and recipes leap out at me and grab my taste-buds and imagination. Thai Chicken and Coconut Curry, Moroccan Chicken with Apricots and Almonds, Toad in the Hole, Burritos and a mouth-watering Chocolate Truffle Cake jostled on the pages for my attention, and it is easy to see that this is freezer cooking for the 21st century. 


Stage two then is to sit down, with a cup of tea and a biscuit, and read the introduction. I like to understand the motivation behind the author for writing the book, and know what they are trying to achieve within its pages. It doesn't take long to realise that this book has been a labour of love for Justine, and the book is not just a collection of recipes, but an education. Justine has spent two years researching and developing this book, and in the process has had not one, not two, but four large freezers in her dining room and garage, and even had to serve Christmas dinner in the kitchen!


The resulting book is jam packed with useful hints and tips, storage solutions, freezer maintenance and how to handle different food types. Each of the recipes comes with instructions on how to prepare, freeze and defrost each dish, along with a guide on how long each will keep when frozen. Each dish however can equally be made and served fresh, which makes it an incredibly versatile book, and one that you can pick up and use day to day, not just on a weekend when you want to bulk prepare freezer meals. The content and detail given to each recipe shows that each dish has been tried and tested over and over by Justine and her family. 

Each recipe has a side bar of handy hints and tips for freezing and serving

In terms of recipe content, the book is divided into eight sections of recipes, based on purpose; Quick Fixes, Meals for One, Family Meals, Entertaining, Puddings, Cakes and Cookies, Food on the Move, and Vegetables. The contents of each of these sections really opened my eyes to the unlimited possibilities when it comes to freezing foods, I'm all in when it comes to freezing the core produce, or making batches of soups, lasagnes and curries to save for a busy day, but some of the sumptuous tarts, cakes and even brownies I would never have thought to freeze (although I'm still not convinced they'd last long enough in our house! 


And so onto the recipe testing! Whilst reading through the book cover to cover, I noted and bookmarked several recipes to try out, and decided to start with the Chicken in Creamy Tarragon Sauce. The key thing that I was looking for in the dish was flavour, as freezing food tends to numb the flavour, and therefore can risk being a little bland when reheated. I didn't need to worry in this instance, these recipes have been well road tested, and this dish was beautiful, fragrant with the tarragon, with a strong flavour coming through from the white wine, onions and garlic, and the sauce has a great creamy texture. There is a great twist in the recipe where the chicken breasts are stuffed with a leek and sun dried tomato filling, and this fills the chicken again with a great flavour that carries itself well with the sauce. We enjoyed it so much in fact that I will be making it again this weekend for my Mum's birthday dinner.

You can find this recipe on the By Book or By Cook blog here.

My attempt at the Chicken with Tarragon Sauce! Delicious! 

In summary, this book is packed full of tasty, flavoursome recipes that thoroughly reflect the trends and tastes of modern day cooking. If you are looking for a really good guide to making the most of your freezer, this is the place to come, but equally if you are looking for a great recipe for a family meal you will not leave disappointed. I certainly will be 'revolutionising' my freezer and my habits after reading this book, and heartily recommend you do the same. 

'Freeze' is written by Justine Pattison, and published by Orion Books. You can order the book from their site here

Disclaimer: I was sent a copy of 'Freeze' by Orion Publishing to review, however all the views and opinions expressed here are my own and are not sponsored.