Pages

Wednesday, 31 July 2013

July's Forever Nigella Round Up: Party Party!


Boy would I like to go to the party where all these lovely dishes were served! Again, the hot weather has kept a lot of us busy, but these five dishes are all delicious and perfect for any party situation you may find yourself in this summer.

Grilled or Barbecued Halloumi with Chilli

Caroline from Caroline Makes must have been the guest of honour when she arrived at a family BBQ with this tasty dish of halloumi marinaded in lemon and chilli. Simple and yet very effective.

Rhubarb and Rose Polenta Cake

Next up is a serious centrepiece for any party, this Rhubarb and Rose Polenta Cake from Choclette at Chocolate Log Blog, which contains the addition of yummy white chocolate, and her homemade rose syrup.

Mini Cheesecakes

Inspired by Nigella's No Bake Cherry Cheesecake, It's A Fine Life created these beautiful fruit topped Mini Cheesecakes for a charity bake sale. I think you'll agree that they would be perfect on any party table too.

Chocolate and Pistachio Macarons

Katharine from Leeks and Limoni created a sensational recipe mash-up with these Chocolate and Pistachio Macarons, using two Nigella recipes for the Chocolate shells and Pistachio filling.

Irish Cream Tiramisu

Last up was my entry of Irish Cream Tiramisu. The full recipe for this dish would make a substantial party dessert, I halved the quantities and still had enough to last us 3 nights! 

Forever Nigella is run by Sarah at Maison Cupcake, head over to her site to find the theme and host for August. 

Monday, 29 July 2013

July's Breakfast Club Round Up: Continental


As hoped for I have a really versatile range of posts for you to celebrate the continental theme for this month's Breakfast Club. I know that the beautiful weather has kept a lot of us out of our kitchens and basking in the sunshine, so I am truly thankful to each of you that linked up this month. 

Wholemeal Savoury Swirls

First in was Michelle from Utterly Scrummy with these, well, utterly scrummy looking Wholemeal Savoury Swirls. Using leftover lentil bolognese sauce rolled up in a tasty bread, and covered in cheese, these nod to Italian cuisine are perfect for any time of the day. 

Breakfast Burritos

Next up was Anshu from My Mom's Recipes with these Veggie Breakfast Burritos. I'm not sure which part of the continent they originate from but when they look this delicious I'm sure it doesn't really matter!

Waffles with Chocolate Sauce

I was really hoping that someone would enter waffles to this challenge, and Caroline of Caroline Makes did not disappoint! These Waffles with Chocolate Sauce are totally decadent and totally yummy, thank you Caroline! 

Turkish Eggs

The next entry came from How To Eat Properly, and was these beautiful Turkish Eggs inspired by a resturant dish. Yoghurt, eggs and spicy butter sounds like the perfect combination of breakfast foodstuffs to me. 

Peach and Apricot Jam

You're in for a real treat now, as this isn't just any Peach and Apricot Jam, this is Prize Winning Peach and Apricot Jam! Camilla from Fab Food 4 All scooped 1st Place at a local fayre with this tasty jam, and it's not hard to see why! 

Croissants

Sliding across the finish line only just slightly after the linky list closed is my entry of Croissants. In my defence, I had started making these before the deadline, but the lengthy proving process took a little longer than planned. Check out my idiots guide though now I've learned the lessons for you!

Breakfast Club is run by Helen from Fuss Free Flavours, head over to her site to find out who is hosting next month's Breakfast Club and what the theme will be.


Croissants: A Beginner's Guide

Croissants were always going to be my entry for this month's Breakfast Club challenge - hence the 'Continental' theme choice. I have always wanted to try and make them, but the lengthy process I have read about does nothing for the part of me that always wants instant gratification from my baking efforts. None-the-less, hosting the Breakfast Club this month gave me the kick I needed (albeit I cut it a little fine by waiting until this weekend) and I hereby present the efforts of my first ever attempt at making croissants... 


I researched several recipes before I set out on this challenge, and tweaked a few things to come up with this version. I actually found that the method for making croissants is relatively simple; knead dough, rest, roll and fold, rest, repeat, then shape and bake. It's the resting periods between each section that make it a time-consuming process. They are however needed to make sure that the pastry remains laminated (layered with butter) as if you work the dough to quickly or too much, the butter will melt into the pastry dough and you will lose the structural integrity of the croissant. Figuring out the timing was something of a pain, so I've tried to do the hard work for you (assuming you would like your croissants sometime around breakfast time!)

Ingredients (makes 8 large croissants)

300 grams strong bread flour
1/2 teaspoon salt
2 teaspoon fast action yeast
35 grams golden caster sugar
100 ml water
250 grams salted butter, cold
1 egg

Method

Day One

5 hours before bedtime: Sift the flour into a mixing bowl. Add the sugar, yeast and salt. Stirring with a wooden spoon, add the water gradually until the mixture comes together as a dough. You may not need all of the water. Turn the dough out and knead for around 5 minutes until smooth and elastic. Return the kneaded dough to the bowl, cover with clingfilm, and place in the fridge for 1 hour.


4 hours before bedtime: Take the risen dough, and turn out onto a lightly floured surface. Roll out into a rectangular shape, and set to one side. Take the cold butter from the fridge and remove the packaging. Place the butter block on a sheet of clingfilm, and fold the clingfilm over the top. Using a rolling pin, bash the butter to flatten it, then roll it to around a third of the size of the rolled dough. Unwrapped the flattened butter, and place it in the centre of the rolled dough.


Fold the two halves of the dough over the butter to create a parcel. Wrap the parcel in clingfilm and refrigerate for an hour.


3 hours before bedtime: Roll out the dough into a long rectangle shape. Fold one third into the centre, then the opposite third over the top. Wrap in clingfilm and return to the fridge to prove

2 hours before bedtime: Repeat roll out and fold. Wrap in clingfilm and return to fridge to prove

1 hour before bedtime: Repeat roll out and fold. Wrap in clingfilm and return to fridge to prove overnight (around 8 hours)

Day Two

Take the rested dough from the fridge, remove the clingfilm and turn onto a lightly floured surface. Roll out the dough to around 3-4 mm thick, aiming for a squarish shape.


Cut the rolled dough into 4 even squares, then cut each square diagonally to make 8 triangles.


Taking each triangle, and stretch one point towards you. Roll from the short edge towards you, to create a fatter middle section.


Twist the ends of the rolled croissant in towards each other to create the classic crescent shape.


Place the rolled croissants on a baking tray, with plenty of space between as they will double in size. Cover with a clean tea towel, and set aside to prove for 90 minutes (1 1/2 hours).


Finally, your croissants are ready to bake. Heat the oven to 200 degrees. Beat the egg, and brush the tops of each croissant with the egg wash. Bake for 10 - 15 minutes until golden brown, then transfer to a cooling rack. Serve warm, and enjoy the freshest, tastiest croissants you have ever experienced!


This is my entry for Breakfast Club, which I am hosting this month, but is run and maintained by Helen from Fuss Free Flavours.


I am also linking up to Made with Love Mondays hosted by Javelin Warrior.


Sunday, 28 July 2013

Lemon and Maple Chicken with Sunshine Rice

Did you know it was sunny outside!? As Brits we have somewhat of a reputation for talking about the weather. And with the developments in social media, it seems that not only do we talk about the weather, but we also tweet about the weather, rant on facebook about the weather, instagram pictures of the sun/seaside/storm clouds, and just to make sure all bases are covered, take screen shots of the weather forecast on our phones, or photos of the temperature gauge on our dashboards to share with all our friends just in case they happened to have not opened their curtains and checked outside for themselves! I would confidently say that 50% of my timelines are filled with "it's too hot", "I'm stuck inside", "check out my sunburn" type complaints, and it is taking all of my will power not to go on an angry keyboard rampage across the web shouting down everyone that utters any of the above. If you like the heat, go outside and make the most of it, if you don't, stay inside with the curtains drawn and the fan on. Either way, it'll be over soon, so just, please, step away from the computer/smart phone/tablet and have some fun! Phew! Ok, that's that taken care of...

Lemon and Maple Grilled Chicken, with Sunshine Rice


I chose Maple Syrup as this month's Feel Good Food ingredient, and it's proved to be a lot more controversial than I expected. I wanted to develop a great recipe to showcase how versatile maple syrup can really be as a healthy alternative to sugar/honey/syrup and use to add a real depth of flavour. As Feel Good Food is all about finding healthier food that still tastes good, I really concentrated on that in this recipe, using whole grain rice, and chicken breasts with the skin off. There also isn't any fat or oil used in the cooking process for this recipe either! 


Ingredients

For the Lemon and Maple Chicken;

4 chicken breasts
Juice of 1 large lemon
2 tablespoons maple syrup
1 teaspoon smoked paprika

For the Sunshine Rice;

400 grams whole grain rice
400 gram tinned chopped tomatoes
300 ml chicken stock
1 teaspoon crushed garlic
1 teaspoon smoked paprika
1 teaspoon basil
1 tablespoon tomato puree
1 yellow pepper, diced
salt and pepper to taste


Method

Start by marinading the chicken. Mix the lemon juice, maple syrup and paprika together in a dish. Score the chicken all over and place into the marinade, coating both sides. Cover with clingfilm, and refrigerate for at least 2 hours. 

For the sunshine rice, add all of the ingredients listed to a large pan, stir well, and place over a medium heat. 

Remove the chicken from the fridge, and place the breasts on a baking tray. Place the chicken under a grill. Pour the leftover chicken and maple marinade into the rice, and stir through. 

Grill the chicken for around 8 - 10 minutes on either side. Check that the chicken is cooked through and then set aside to rest. Check the rice, it will have had around 25-30 minutes cooking time now. Because it is cooking in the tomatoes rather then just water, it will take a little longer than the packet instructions, so just keep testing it until it is soft. 

Once the rice is soft enough, serve alongside the grilled chicken.


This dish is light, and flavoursome, with the sweetness of the maple and the sharpness of the lemon flavouring the chicken well, and cutting through the fruity tomato flavour of the rice. Perfect for a summer's evening out on the patio, or for bringing the sun back on those less sunny days!

Nigella's Irish Cream Tiramisu

I spent a long time trying to decide which yummy Nigella recipe I would choose for my Party Party entry, but when I came across this recipe for Irish Cream Tiramisu, I just knew I'd found my recipe soulmate! 


I made just two amendments to the recipe, firstly, I halved the ingredients from the original, as it only needed to feed me and Gary. (This still made enough for 6 portions, so the original quantities would make a serious party dessert!) Secondly, when I came to measure out the Baileys, I had nowhere near enough left (I wonder where that could have all gone...?) so I made up the quantity by adding Tia Maria and some double cream. It worked a treat! 


You can find the original recipe here.

Ingredients

5 teaspoons espresso powder, dissolved in 175ml hot water then cooled
125 ml Baileys
200 grams savoiardi biscuits (lady fingers)
1 egg, separated
37 grams golden caster sugar
250 grams mascarpone cheese
1 tbsp cocoa powder


Method

Mix the cooled espresso with the half of the Baileys. Take half the savoiardi biscuits, and dip them one at a time in the espresso mixture, allowing them soak in enough liquid without getting soggy. Layer the soaked biscuits in the bottom of a 8''x4'' dish. 

In a large mixing bowl, whisk together the egg yolk and the sugar until smooth and creamy. Add the remaining Baileys and the mascarpone, and whip together until well combined and smooth. In a separate bowl, whisk the egg white until white and frothy. Add to the mascarpone mixture and fold in well. 

Add half of the mascarpone mixture to the dish and spread evenly over the first layer of biscuits. Soak the remaining biscuits and create a second layer. Add the remaining mascarpone mixture and spread over the top. 

Finally, sprinkle cocoa powder over the top of the dish, and refrigerate until ready to serve. 


This is my entry for this month's Forever Nigella, run by Maison Cupcake, and hosted by myself this month.


Thursday, 25 July 2013

Aztec Cookies - Random Recipes Big 3-0

Aztec Cookies

I actually made these cookies right at the beginning of the month as soon as Dom announced the Random Recipes challenge, but it's taken me this long to get my act together and write them up. (See previous posts re: loss of mojo and subsequently getting it back) The challenge this month was to celebrate the 30th month of Random Recipes by selecting the 30th recipe from the 30th book on the shelf. 

My 30th book was The Great British Bake Off - How to Turn Everyday Bakes into Showstoppers. The 30th recipe was Aztec Cookies. I tend to have a fail-safe go-to cookie recipe, so this recipe was one that had so far passed me by, and probably would have continued to do so. On closer inspection however, I realised that these cookies contained all the things that are good in the world... chocolate, coffee, white chocolate and glitter! Win!

I made a couple of tweaks to the recipe, changing the flour to wholemeal as it's healthier, and using instant coffee and vanilla bean paste rather than extract as that's what I had to hand. These cookies are soft rather than chewy, and the wholemeal flour gave a really nice texture. I do prefer my cookies of the chewy variety, but I can't fault the flavour combination in these, and I'm a sucker for a sparkly baked treat! 


Ingredients

140 grams dark chocolate
2 tablespoons instant coffee granules 
65 grams salted butter
2 large eggs
1/2 teaspoon vanilla bean paste
130 grams golden caster sugar
185 grams wholegrain plain flour
100 grams white chocolate

edible gold dust or glitter to finish


Method

Melt the dark chocolate and salted butter together over a bain-marie. Add the instant coffee and stir until completely dissolved. 

In a separate bowl, whisk together the eggs, vanilla and sugar. Add the melted chocolate mixture and stir thoroughly. 

Sift in the flour, and fold into the mixture until fully combined. Roughly chop the white chocolate, and add to the mixture. 

Grease a baking tray, and heat the oven to 160 degrees.  Place spoonfuls of the mixture on the tray, leaving space for the cookies to spread. You should be able to fit roughly 6 cookies at a time on the sheet. 

Bake for 10 - 15 minutes, until they are just firm to touch, and the surface is cracked in appearance. Remove the tray, and using a pallet knife, slide the cookies onto a cooling rack. Repeat until you have used all of the mixture. 

Finally, sprinkle a little of the glitter over the still warm cookies for that extra special sparkle. 


Random Recipes is hosted by Dom at Belleau Kitchen


Wednesday, 24 July 2013

Rocky Road Ice Cream and Finding My Mojo

It's fair to say that my blogging mojo has been somewhat depleted this month. I can't put my finger on why, maybe it's the heat, but then I've still been baking and cooking up a storm. Whatever the reason, I had a piece of good news this week that has gone some way to restoring my self-confidence and therefore I think my mojo may be back. I have a back log of recipes ready to be uploaded, all of which were planned to be linked up to challenges before the end of this month, so hold onto you hats because they are going to be coming thick and fast over the next few days! 

Oh, and what was the good news I hear you ask... my recipe for Teriyaki Beef Burgers only went and blooming won the Kikkoman recipe challenge! I cannot tell you how surprised and overwhelmed I am to have won, especially as the competition was seriously stiff (check out the two runner up entries) but it seems the judges liked burgers! (well who doesn't really...) 

So back to the main content of this post. This month's We Should Cocoa challenge, hosted by Choclette from Chocolate Log Blog, is Ice Cream. There are two things you should know about my entry. Firstly, after making Elizabeth's Kitchen Diary's Mint Choc Chip Cookie Dough Ice Cream, I am a convert to condensed milk based no-churn ice cream, and will never look back. 

Rocky Road Ice Cream frozen in a Silicone Muffin Pan for easy portions

Secondly, I had a flash of inspiration a while back regarding the freezing of ice cream, and used a silicone muffin pan to freeze this ice cream into individual straight-from-the-freezer portions - the result - no mess, no waiting for ice cream to thaw before the scoop will work, you just pop a portion out of the silicone and away you go! (Plus it also helps little piglets like me with their portion control, no more eating half a tub by accident!) 

When I made the Mint Choc Chip Ice Cream I also experimented with using a silicone bundt tin. This also works really well, you can turn out the frozen ice cream onto a serving plate as a centrepiece dessert for a dinner party, much more elegant than the tub don't you think, and then serve in easy slices! 

Mint Chocolate Chip Cookie Dough Ice Cream frozen in a Silicone Bundt Tin
Here is my recipe for no-churn Rocky Road Ice Cream, the below makes approx 1/2 litre Ice Cream...

Ingredients

200 grams condensed milk
300 ml double cream
100 grams dark chocolate
100 grams chocolate chips
50 grams mini marshmallows
50 grams chopped nuts
50 grams raisins

Method

Melt the dark chocolate, 30 seconds in the microwave should do it. You don't need to worry about tempering the chocolate, as it doesn't need to re-set, however be careful not to let it burn. 

Whisk together the condensed milk and double cream to soft peaks. Add the melted chocolate and whisk until fully combined. Add the chocolate chips, marshmallows, nuts and raisins, and stir through. 

Pour the mixture into whatever container you have decided to use, and freeze for at least 4 hours. 

Individual Portion of No-Churn Rocky Road Ice Cream
This is my entry for July's We Should Cocoa


Saturday, 20 July 2013

Spicy Falafel Wraps

The Pantry Door household is an extremely carnivorous one I am not ashamed to say, and meat usually features somewhere in our evening meal. On the odd occasion that I make a vegetarian dish, I tend to get the response "it's nice - but it's missing something..." To this day, this is the only dish I have made that managed to satiate the desire for meat so much so that for a while, we even forgot that we hadn't eaten any. 

Falafel

Ever since following Paul Hollywood's 'Bread' series and pushing myself to make my own breads I haven't bought tortilla wraps, as they are so quick and easy to make at home, and taste soooo much better. The recipe given below is adapted from Paul's, as I have tweaked it to suit our tastes. 

Ingredients (serves 2)

For the falafel;

1 small onion
1 tbsp olive oil
1 tbsp caster sugar
1 400g tin chickpeas
1/2 tsp cumin
1/2 tsp coriander
1 tsp chilli flakes
2 egg yolks
a little flour

For the wraps;

125 grams strong white bread flour
125 grams strong wholemeal flour (plus extra for dusting)
1/2 teaspoon salt
1 teaspoon dried fast-action yeast
2 teaspoons golden caster sugar
20 grams salted butter
160 ml tepid water
a little vegetable oil

Additional ingredients;

1 block Halloumi cheese
1 red pepper
Assorted salad leaves
Houmous

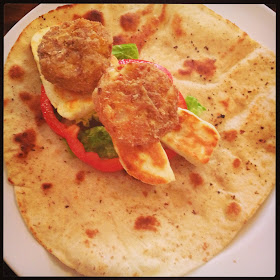
Layered Up! Houmous, Salad, Halloumi and Falafel ready to be wrapped!

Method

Firstly, prepare the falafel. Heat the oil in a frying pan. Finely chop the onion, and shallow fry in the oil, adding the tablespoon of caster sugar, and cook until the onions start to caramelise and brown. Remove from the heat, and transfer the onions to a sheet of kitchen towel to drain the excess oil. Drain the tinned chickpeas. Blitz the chickpeas quickly in a food processor, you want them to be chopped roughly, not puréed. In a large mixing bowl, mix the chopped chickpeas, onions, spices and egg yolks together well. Take a spoonful of the mixture, form into a ball, and roll in flour. Place the ball onto a tray, and repeat until all of the mixture has been used. Place the tray of falafel balls in the fridge for at least 2 hours. 

Next, make the wraps. Sift the flours into a large bowl, and add the yeast, salt and sugar, making sure the yeast and salt don't come into direct contact. Add the butter, and rub into the flour. Add the water a third at a time, and mix well until the dough comes together. Knead the dough for 5 minutes until smooth and elastic, then return the bowl, cover with clingfilm, and leave for an hour to double in size. 

Once the dough has risen, turn out onto the work surface and knock back. Divide the dough into 8 equal pieces. Heat a little vegetable oil in a frying pan. Take one of the pieces of dough, and roll out on a floured surface until 1-2mm thick. Transfer the thinly rolled dough to the frying pan, and cook for around a minute on each side. Repeat with the remaining 7 pieces of dough. 

Finally, prepare the components for the dish. Deep-fry the falafel balls for around 3-4 minutes until golden brown. Slice the halloumi cheese, and grill until golden. Slice the red pepper and prepare the salad leaves. 

Grilled Halloumi Cheese

Serve all the components, so the wraps can be assembled at the table. Layer up the houmous, red pepper, salad leaves, grilled halloumi and falafel pieces into the wraps, roll up, and dig in! 


I'm linking this recipe up to Alphabakes, hosted by Caroline Makes and The More Than Occasional Baker, as this month's letter is F for Falafel! 


I'm also linking in to Made with Love Mondays hosted by Javelin Warrior as everything is made from scratch.