Hi! Welcome to my blog. I am a major foodie, with a haphazard cooking philosophy, currently making that transition from cooking and baking for friends and family to 'wonder if I could make this my career'. Follow me for recipes, the outcomes of a few experiments, and general lovely foodiness. Opinions, reviews and recommendations are all my own.

Wednesday, 29 May 2013

May's Classic French Round Up: Macarons

I am so pleased to have hosted this month's Classic French challenge for Jen over at Blue Kitchen Bakes, and even more so to see all the amazing flavours of macarons that have been submitted. I picked macarons as a theme because the flavours can be so versatile, but I don't think I expected the range of flavours and colours that I am about share! Stand back for a rainbow coloured feast for the eyes! 

Lavender and White Chocolate Macarons

I kicked off the challenge this month with Lavender and White Chocolate Macarons, using the new Taste the Difference Lavender infused Sugar from Sainsbury's and pairing the flavour with a white chocolate ganache centre. They were delicate and floral, and although not entirely perfect that really didn't matter to my tasters.

Kransekake - Marzipan Macarons

Next up was Choclette over at Chocolate Log Blog, who entered these unusual Marzipan Macarons, or Kransekake. Although Scandinavian in origin, these gorgeous looking biscuits are full of almonds, marzipan and egg whites, (not to mention covered in chocolate) and that makes them good enough for me!

Limoncello Macarons

Our next entry was Limoncello Macarons from Caroline from Caroline Makes. The very mention of Limoncello had my mouth-watering before I'd even opened the post, and the addition of a White Chocolate ganache filling makes these one of my favourite flavour combinations.

Double Raspberry Macarons

Lucy of Supergolden Bakes left me speechless with the photography of her gorgeous Double Raspberry Macarons, which her little boy affectionately calls 'macaroonies' and even has a little dance for! I'd be dancing if someone offered me one of these exquisite looking treats too! I love the decorative sprinkles...

Rhubarb and Vanilla Macarons

Next up were these bright pink beauties from Michelle at Utterly Scrummy, beautifully coloured pink and filled with a Rhubard and Vanilla Jam, I bet these flavours worked incredibly together, the Rhubarb and Vanilla Jam alone sounds delicious!

Vanilla and Blueberry Macarons

Janine at Cake of the Week entered these lovely golden Vanilla and Blueberry Macarons, which have a vanilla flavoured shell, and a bold blue blueberry swiss meringue buttercream filling that looks exquisite, they're just like little jewels!

Chocolate Macarons

It's A Fine Life entered these beautiful Chocolate Macarons, with a simple whipped cream filling. They were chilled for 24 hours before eating, which shows an amazing amount of will power, and we are assured that they were well worth the wait!

Chocolate Dipped Mango Macarons

Gill from Tales of Pigling Bland submitted these amazingly posh sounding Chocolate Dipped Mango Macarons, with a gorgeous homemade Mango Curd filling. The half dipped dark chocolate  case looks fantastic too.

Earl Grey Macarons

Our next entry was from Elizabeth at A Girl In Her Kitchen, and she made these incredibly elegant Earl Grey Macarons, filled with an Earl Grey infused Ganache! This was the first time Elizabeth had made or even eaten a macaron, and they look just beautiful - what a great flavour choice!

Chocolate and Raspberry Macarons

Jen, our Classic French creator from Blue Kitchen Bakes hadn't attempted Macarons before either, and has entered these Chocolate and Raspberry Macarons, always a winning flavour combination! Jen proved true the saying 'if at first you don't succeed' with these great looking macarons, you'll have to head over to her post for the full story!

Thank you so much to everyone for taking part this month, it has been an absolute pleasure to host the challenge and I am totally inspired and in awe of the amazing entries that have come in. Don't forget to head over to Jen's blog to find out the theme for June's Classic French challenge

Monday, 27 May 2013

Honey-Nut Oat Clusters, and a Review of Clarks Honey

Honey-Nut Oat Clusters

Earlier this month I was sent a selection of Maple Syrups and Honeys to review from Clarks. I have already reviewed the Maple Syrups along with my recipe for Superfood Pancakes here. Clarks have also branched out into a great range of honeys, you can buy them here from Amazon. I was sent a Clear Blossom Honey, as well as Acacia and Lavender varieties. The recipe below uses the Clear Blossom, however you could use any flavour honey in the recipe, to achieve different tastes and flavours to suit.

Of the samples sent out to me from Clarks, my favourite has to be the Acacia, which is a milder tasting honey by its nature, and is great for adding to beverages as a replacement for sugar, or using to sweeten dishes. If however you are making something where you want the honey flavour to be one of the key tones, using a blossom honey will give a more distinctive taste.

A selection of the Maple Syrups and Honeys available from Clarks

I have developed this recipe for Honey-Nut Clusters as I recently won an Easi-Yo yoghurt maker after entering my Plum and Almond Crumble into the Credit Crunch Munch challenge. I have been experimenting with homemade yoghurt ever since, but both Gary and I agreed that we needed to find something with a bit of 'crunch' to top it off. This is a great basic recipe, and could easily be adapted by adding various dried fruits, nuts or even some chocolate chips to achieve different flavours and textures.

Ingredients

300 grams Rolled Oats
50 grams Golden Caster Sugar
1/4 teaspoon Salt
1/2 teaspoon Cinnamon
100 grams Mixed Chopped Nuts
150 grams Blossom Honey
1 teaspoon Vanilla Bean Paste

Method

Combine the oats, sugar, salt, cinnamon and mixed nuts in a large mixing bowl, stir well. 

Add the honey and vanilla bean paste to a smaller bowl, and mix together. Blossom honey can crystalise, and if yours has, place the bowl in the microwave for 15 seconds to thin the mixture back down again. 

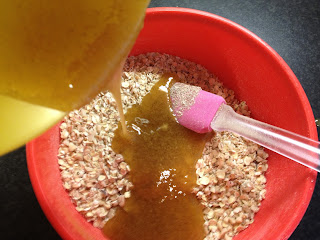
Pour the honey and vanilla mixture into the dry ingredients. 
Mix well so that the honey is evenly distributed throughout the dry ingredients.

Transfer the mixture onto a lined baking sheet, spread evenly, and press down with the back of a spatula or wooden spoon to compress the mixture. 

Bake at 180 degrees for 15 - 20 minutes until golden brown, take care not to let the edges go too dark or they will taste bitter. Once golden, remove from the oven and set aside to cool completely.  

Finally, once cool, break into clusters. Stored in an airtight container, these will keep up to 2 weeks. Sprinkle over fresh yoghurt, and add an extra glug of honey for a tasty breakfast. 


Friday, 24 May 2013

Brioche and The Final Episode of Paul Hollywood's Bread

I've been procrastinating about writing this post for the last few weeks, and it's about time I just sat down and did it. Maybe I've been suffering a little from blogger's block, or maybe as is oft my way, I have that much on my to-do list that I've just been faffing about and not doing any of it. A little bit I think it's because this will be my last post in the series that I have been writing about and following Paul Hollywood's 'Bread' and a little part of me is kind of sad that it's all done and dusted. 

Clockwise from Top Left: Classic White Bloomer, Flour Wraps, Homemade Pizza, and a White Loaf

That being said, I am so pleased that I set myself this challenge, and that I stuck it out to the end. When I started out, I had made a few attempts at baking a white loaf before, with varying degrees of success, had just about mastered Hot Cross Buns, and that was the extent of my bread-making ability. Now, I can readily make a fresh loaf, wraps, naan breads, pizza dough, soda bread, sourdough and brioche to name but a few. I have an active jar of sourdough starter in my fridge, and have used it every Sunday for the last three weeks to make a number of different loaves. Once a week, I make fresh pizza dough when I get home from work, instead of going to the take-away. And I have even been brave enough to start experimenting with recipes and creating my own, my Sourdough Cheese Pinwheel Loaf went down with Gary so well that I have had to make it again - definite win! 

Clockwise from Top Left: Naan Breads, Soda Bread, Cheese Filled Rolls and Pitta  Breads

Clockwise from Top Left: English Muffins, Sourdough Loaf, Sourdough Starter, Sourdough Cheese Pinwheels

The final episode of 'Bread' was based on enriched doughs, these are breads that have the addition of eggs or butter in the dough, and create a rich and decadent taste and texture. After watching the episode, there was only one loaf that I wanted to try, the Savoury Brioche Couronne, stuffed with parma ham, mozzarella and twisted into a crown shape, it sounded right up my street. 

I used Paul's recipe, which can be found here on the BBC website the only change I made was I halved the ingredients as it looked to make a very large loaf. I was right to do so, as even the halved quantities made a loaf big enough to feed Gary and I for several days. The recipe worked without a hitch, I don't have food processor yet, so I used a hand whisk with dough hook attachments, and it worked just as well. 

The enriched brioche dough

Rolled and filled with Parma ham and Mozzarella

Twisted into the classic Couronne shape

Baked and Golden : Savoury Brioche Couronne
This whole project has been so rewarding, I have learnt so much about the different doughs and methods for producing different styles of bread, and I am so pleased that bread-making is now a staple part of food preparation and meal times in our house. The Paul Hollywood book is great for beginners like me, because of its pictorial instructions, and equally so for the more seasoned baker, as there are a real breadth of recipes and meal ideas to challenge any ability. I think that the addition of the TV series has really made this process come to life for me, and I definitely learnt additional hints and tips from the show that aren't covered in the book. I really hope that the BBC commission a follow up series to this, but regardless I know that my bread adventure has really only just begun, and I now have the confidence to go out there and keep trying new bakes. Thank you Paul! 

Monday, 13 May 2013

Superfood Pancakes, and a Review of Clarks Maple Syrup

Scotch Pancakes, Blueberry Pancakes, Drop Scones
Superfood Pancakes

I was recently sent some samples of Maple Syrup and Honey from Clarks to try, and within the same week, in fact literally a few days later, there was an article published by the Daily Mail detailing how maple syrup had been elevated to the lofty status of 'superfood'. I was curious to explore the science behind the idea of 'superfoods' a little, as it is a term that is used seemingly quite feely, and I wasn't entirely sure of the substance behind it. As it turns out, there are two opposing camps out there on the subject of superfoods, on the one side those who believe that superfoods contain high levels of antioxidants and phytochemicals that have substantial health benefits, and the other side, those who believe the terms is one invented and exploited by marketing companies. (It is worth noting that there is no legal definition to the term 'superfood'.)

A selection of Maple Syrup and Honey from Clarks

If we choose to look on side of those that do believe in the power of superfoods, then in simple science superfoods are those that are especially high in key nutrients, such as Omega 3, antioxidants and potassium, which are considered to have affects such as reducing the risks of cancers and cardiovascular diseases, increasing your immune system, and reducing depression. 'Famous' superfoods include blueberries, broccoli, oily fish and green tea to name but a few, and now, maple syrup can be added to that list. 

Predominantly maple syrup contains phenol compounds that house enzymes that convert carbohydrates into sugars, and the recent studies suggest that this could be the basis of an anti-diabetic compound. In addition, maple syrup also contains a high density of antioxidants, which are key in slowing down the oxidization, or ageing of the bodies cells, something that is not found in other natural sweeteners, even including honey. You can find more information on the health benefits of maple syrup on the Clarks website here.

All this talk of superfoods got me thinking, and as someone who constantly strives and yet falls short of eating a healthy diet, I wanted to have a go at creating something with my maple syrup that would make the most of it's new 'superfood' status. I had a look at some of the other ingredients that are also considered superfoods, and came up with this recipe for 'Superfood Pancakes', which is loosely based on scotch pancakes, or drop scones as they are also known in some parts of the UK. Containing blueberries, oats, and wholemeal flour, there are four, yes four, superfoods in this recipe! Which makes them really very good for you in my book (if you overlook the milk, sugar and butter content). 

Superfood Pancakes


Ingredients

150 grams wholemeal self raising flour
50 grams rolled oats
100 grams golden caster sugar
200 ml semi-skimmed milk
1 large egg
150 grams frozen blueberries

a little butter to cook

maple syrup to serve

Method

These are the easiest breakfast/ brunch/ snack to make, just beat the batter together and cook it! The quantities given should make 12 - 15 pancakes.

Sift the flour into a large bowl, add the oats and golden caster sugar, and mix well...

Whisk together the milk and egg, make a well in the centre of the dry mix, add the liquids, and whisk together to form a batter...

Add the frozen blueberries and mix well into the batter...

Melt a little butter in a frying pan or on a griddle, and drop three dessert-spoonfuls of the batter into the pan. It will spread a little but not greatly...

When the pancakes start to have little bubbles in the surface, and are colouring around the edges, flip them over carefully to cook on the other side...

And then serve hot, with a good healthy drizzle of maple syrup!

Gary and I had three pancakes each, which we topped with each of the three maple syrups in order to 'judge' each one. The vanilla maple syrup was noticeably sweeter than the others, although honestly I didn't get much of a vanilla flavour coming through. The Grade 1 and Grade 2 syrups were great, the Grade 2 definitely being my favourite, with a real earthy flavour coming through which worked perfectly with the pancakes.

I'm entering this recipe into Credit Crunch Munch, run by Camilla and Helen, and hosted this month by Janice at Farmersgirl Kitchen, as it is made from store cupboard ingredients, and cheap to make.


I'm also entering into Made with Love Mondays run by Mark over at Javelin Warrior, as it was made totally from scratch, on a Monday, with a lot of love... simple! ;-)


Disclaimer: I was sent a selection of maple syrups and honey to try by Clarks, however all opinions expressed in the post are 100% honest and my own.

1st June 2013 - I am updating this post to be entered into the Feel Good Food challenge, hosted by myself, as the theme is blueberries, and these pancakes are super-nutritious!


Sunday, 12 May 2013

Product Review: Walkers Hoops and Crosses

For me, the opportunity to review a new product for Walkers was like a call from the mother-ship. I am a complete sucker for crisps of all varieties and flavours, equally happy munching on a bag of Kettle Chips as I am hunting out childhood favourites such as Wotsits and Monster Munch. Filling up my car with petrol every week comes with the added challenge of lining up to pay alongside the shelves of crisps and fighting the urge to grab a few bags for the journey home. They really are my one true weakness, and for that reason, Walkers can be assured here of a thorough review of their product, but should also know that they have some very high standards to meet! 

The product in question is their new snack 'Hoops and Crosses'. Designed primarily for kids, Hoops and Crosses are pitched as a source of wholegrain, and the press pack information that came with the sample revealed the somewhat worrying fact that 27% of children in the UK do not have any wholegrain in their diet at all! The term wholegrain is quite feely bandied about nowadays as something that is 'good for us' and that we should be eating more of, but rarely do people explain why. I'll try and cover it as succinctly as possible...

The Anatomy of a Grain: Source - Whole Grains Council

The grains themselves can be from any cereal product, including wheat, oats, rice, rye, barley and maize. The grains themselves are made up of three parts, the bran, the germ, and the endosperm. In white (refined) products, only the endosperm is used, and the bran and germ discarded. In wholegrain products, all three elements are used. Essentially, the endosperm is almost entirely carbohydrate in its make-up, whereas the bran and germ elements contain high levels of fibre and iron in particular, as well as protein, Vitamin Bs, Omega 3 and other lovely good stuff. When you know this, why on earth would you eat the plain white stuff!?

So back to the task in hand...


The samples came from Walkers in a lovely box, and when I opened it I found Monty the Monkey inside! The sample pack was a Roast Beef flavour, and a little bit of digging told me that Hoops and Crosses are currently available in three flavours; Salt and Vinegar, Roast Beef and Prawn Cocktail. Something about this pleased me, I think it was a pleasant surprise to see that they hadn't stuck to the usual suspects of Cheese and Onion and Ready Salted.

The bag itself felt very light, and when I checked the details, one bag contains 18g of product. Upon opening and emptying the contents into a bowl however I quickly revised my opinion, there were plenty of crisps in the packet, even for an adult crisp monster like me! The crisps were so tasty! They had plenty of flavour, and because they are baked not fried they aren't greasy to the touch or taste. Gary and I shared the bag, and he was equally impressed with the flavour, which is a big deal, as unlike me he can take or leave crisps, and is a bit fussy about flavours.

The best part, each bags is only 85 calories, so as well as being good from the whole grain, and good from the baked-not-fried bit, there is a feel good from knowing that as a snack they are about as low-cal as you can get. I will definitely be buying these again, and they will be replacing a lot of my lunchtime/ late night crisp binges I think!


Disclaimer: This post is sponsored, however all views and opinions expressed are my own, and I was asked to be honest in my critique. 

Friday, 10 May 2013

Simple Sourdough Loaf, and Episode Four of Bread

My sourdough journey has been somewhat bumpy, to say the least, and it has kind of derailed my mission to follow and bake from each episode of Paul Hollywood's TV series 'Bread' as the two weeks it took me to cultivate my sourdough starter meant that the series had ended before I got chance to turn the oven on...

That being said, I think it is fair to say that if Paul's mission was as he said to get the British baking bread, he has certainly succeeded with me - if I put half the amount of effort that I have taken in researching, practising, debating and fine-tuning my sourdough into my day-to-day life, I'd be some sort of multi-millionaire genius by now! 


I've documented the trials and tribulations I experienced actually cultivating my sourdough starter (Gizmo II) here, and am pleased to report that he is now healthy and residing on the bottom shelf of the fridge so that he only has to be fed once a week. When it came to making my sourdough loaf, I used Paul's recipe, which you can find on the BBC website here, and made just a few changes;

Gizmo II and my already well worn copy of 'Bread'
  • I used half the amount stated of strong white flour, and made up the rest with rye flour, as I wanted the rye flavour
  • As I don't have a banneton or proving basket, I liberally floured a mixing bowl, and used that to get my shape
Sourdough proving in a mixing bowl for shape
  • I used a mix of strong flour and semolina to dust the baking sheet and the top of the loaf to prevent it from spreading outwards when baking. 
Dusted with flour and semolina and ready to bake

I was really pleased with the texture and taste of my sourdough, I'd never actually tasted one before, so didn't know what to expect, but it reminded me a little of the real ales that my Dad used to drink, quite a hoppy smell and taste. I can tell you that it was absolutely divine, both on it's own, and topped with scrambled eggs and grilled tomatoes for breakfast! Mmm... 

My finished sourdough loaf, fresh from the oven

Wednesday, 8 May 2013

Light Summer Style Fruit Cake, and Two Very Special Cakes

If you visit my little blog regularly, you will know by now that I jump between experimenting with recipes and teaching myself cake decorating. I am harbouring a not so secret desire to one day quit the rat race of medical sales, and become a self employed cake decorator, although trust me, at the moment that day seems a long way off in the distance. I have the best family and friends in the world, who are constantly requesting cakes for events to test me, and this month I faced my two biggest and most important challenges yet, as I have baked for two very special events.

Firstly, my grandparents business is celebrating it's 50th year, which is such a fantastic achievement, even without considering the current financial climate. They have built such a wonderfully solid family run business together, and we are all so proud of them. Secondly, Gary's Mum was sworn in as Mayor of Newton Abbot, his hometown in Devon, and we were invited down to the Mayor Making Ceremony, which definitely called for cake! 

Summer Style Fruit Cake

For both occasions, because I was going to be making cakes that would be on display, and would be consumed by a lot of people, I wanted to make a good solid fruit cake, that would be robust enough to be sculptured, transported, and sit in the open air possibly for hours at a time. For me, I always associate fruit cake with Christmas Cake, and brandy soaked fruit, and I really didn't want that flavour for these cakes, what with both events being in May. I had previously made these Honey, Fruit and Nut Flapjacks using tropical fruits, and they tasted so floral and summery I decided to try and get that taste into my cakes. I grabbed my favourite Christmas Cake recipe, and started to chop and change the ingredients, and this is what I came up with...

Ingredients:

330g sultanas
170ml cold green tea
zest and juice from 1 small lemon
85g dried apricots
85g dried tropical fruit (I used a mixed selection that was already partially re-hydrated)
130g cherries
170g salted butter
170g golden caster sugar
3 eggs
zest of 1 lemon
15g honey
170g plain flour
30g roughly chopped pistachio nuts

Method:

(I made three cakes together here, so the images of the fruit portions may look considerably more than the quantities stated. The method remains the same)
  • Start by soaking the sultanas to make them extra juicy. Brew the green tea, and leave to cool completely. Once cool, add the green tea to the sultanas and add the juice and zest of one lemon. Leave to soak for at least two hours, or overnight if possible. (I used partially rehydrated apricots and tropical fruits, so didn't need to soak them. If you are using fully dried fruits, add them to the sultanas to soak before use)
  • Pre-heat the oven to 150 degrees. Prepare a 20cm/8 inch cake tin by lining with greaseproof paper. Prepare a 'lid' for the tin also, by cutting another piece of greaseproof the same size as the tin, and cutting a small cross in the top to allow steam to escape. 
  • Prep the remainder of the fruit by chopping it into pieces roughly the same size as the sultanas and halving the cherries.
  • In a separate mixing bowl, beat the butter until smooth, then add the sugar and cream together.
  • Add the eggs one at a time and beat in. 
  • Add the lemon zest, honey and flour, and fold the mixture together until all the ingredients are fully combined.
  • Add the chopped pistachios, and the mixed fruit, and stir through well, so that the fruit is evenly distributed through the cake mixture.
  • Transfer the mixture to the prepared tin, cover with the lid, and bake for 2 and a half hours, checking after the first 2 hours. The cake is cooked when a skewer inserted into the centre of the cake comes out clean. 
  • Once cooked, remove the cake from the oven, and place on a cooling rack. Leave the cake to cool completely in the tin before removing it. 
  • Cover and decorate as desired.
Because I was sculpting these cakes into a shape, I had the baker's privilege of sampling the cakes upfront, and my goodness did it taste good! The cake has all the structural integrity of a Christmas cake, but the flavour is light and delicate, and the lemon and green tea flavours sit really well with the tropical fruits and apricots. Soaking the fruit in the green tea makes the final cake wonderfully moist as well, despite not being 'fed' with copious amounts of booze like a traditional fruit cake. I would thoroughly recommend this recipe for a summer wedding or similar event as a great seasonal alternative to traditional fruit cakes. 


And as for what I did with these beautiful cakes once I had baked them... well...