Hi! Welcome to my blog. I am a major foodie, with a haphazard cooking philosophy, currently making that transition from cooking and baking for friends and family to 'wonder if I could make this my career'. Follow me for recipes, the outcomes of a few experiments, and general lovely foodiness. Opinions, reviews and recommendations are all my own.
Showing posts with label Birthday. Show all posts

Wednesday, 6 March 2013

New Cake Designs and Working With Fondant

For those of you who are regular readers of my blog, you'll know by now that I split my time between baking and trying out new recipes, and teaching myself cake decorating techniques. I'm fortunate enough to have some wonderfully supportive and trusting friends, who keep testing me with new designs and requests for their loved ones birthdays and special events. I'm truly grateful to you all, as Gary and I would never be able to eat enough cake to try out all of these ideas (although we do give it a bloomin' good try!) 

So, these are the latest few projects I have been working on over the last few weeks... 
'Cute as a Button' Cake

First up was a gift for a friend who has just had baby number two. The girl's and I descended last Friday night for coffee, cuddles and cake, and I made this adaptation of a basic sponge cake, using raspberry jam, and replacing the traditional buttercream with a white chocolate ganache. I use a button mould from Baked by Me and white chocolate coloured lilac and pink to make a cute button decoration for the sides. The white chocolate and raspberry combination was very tasty, and a great alternative to the traditional Victoria sponge.

Dark Mocha Xbox Controller Cake


The next cake I had to make was for Gary's birthday, my toughest critic, so no pressure! I spent ages trying to decide on a design and a flavour to make this one extra special, and eventually settled on a dark chocolate mocha cake, by adapting my favourite chocolate cake recipe (recipe here). I doubled up the quantities listed on my post, and add two tablespoons of instant coffee to the hot water mixture. I filled the cake with a dark chocolate ganache made with two teaspoons of Tia Maria.  The addition of coffee to this cake enhances the dark chocolate flavour and creates extra depth more than making a strong coffee taste. I spent hours on this cake, making the buttons, and using a toothpick to draw out the details (they aren't really clear from this picture). It took Gary four days before he would cut a slice from this cake, as he didn't want to cut into it, which I think means that I did a good job! The chocolate cake kept well, and the flavours had time to mature, and when we did cut in it was moist, rich and chocolate-y, exactly what I had hoped for!

Fondant Boxers
The next cake I made for my friend's nephew, who was turning nine. She texted me and asked if I would be able to make a boxing ring cake - it is worth noting that I do not have that little part of a brain that allows you to say 'No' - 'of course I can' I texted back... then I panicked. I turned to trusty Google, and started looking at pictures of boxing rings, and boxing ring cakes. The ring itself was pretty straight-forward, it just needed to be square and blue. That's where it got tricky. Nowhere could I see a solution for making the posts edible,and all the forums I looked at came up blank. In the end, I had a flash of inspiration - this is how I made the posts - incredibly delicate and fiddly but it worked a treat. I took four Italian breadsticks, and rolled out some fondant in red, white and blue. I used edible glue to stick the breadsticks to the fondant, and rolled them to cover the sticks completely. I left these to dry and harden overnight. 
Boxing Ring Cake

The following day I took a long skewer, and used it to carefully make three holes through each of the sticks. The brittle breadsticks and hardened fondant were very fragile (I did make a back up set and used them all as I had a few breakages) but in the end I was able to fix the posts to the cake, two white and then a red and a blue corner, and thread strawberry laces through the holes to form the ropes. 

The boxers are made from fondant, and I figured out how to make them after adapting skills from a tutorial on Bake Happy on how to make fondant people. All in all I was really pleased with the outcome of this cake, although I did have to use some white icing as glue which looked a little rough around the edges of some of the posts. 

The final cake to share tonight is one I made for one of my dearest friends to take to her Mum as an early Mother's day gift. This is a simple Victoria sponge, with raspberry jam and buttercream, and originally was going to have sprinkles on top, however a last minute phone-call led to a decision on the doggy toppers. This family love their dogs a great deal, and I really wanted to do justice to the three personalities of the pooches. I asked my friend to send me pictures of the dogs, and got to work with the fondant... these are the finished dogs and their real life pictures, I hope I did them justice! 


'Playful Pooches' Cake

Sunday, 20 January 2013

Microphone Cupcakes: A How To Guide

Microphone Cupcakes

Yesterday I uploaded a post about my cousin's birthday party, where I made her a One Direction cake, and a batch of these microphone design cupcakes. I mentioned that I had a few troubles along the way, and I wanted to share with you all a step by step how I made these, and a few things I would do differently next time. 

To make these sparkly little treats, you will need the following;

- A good quality sponge cake batter
- Ice cream cup cones (the ones with the flat bottoms)
- Edible silver spray - I used Dt Oetker's Shimmer Spray in silver, from Tesco
- Plenty of kitchen roll
- Buttercream frosting
- Coloured sugar crystals - I used silver and pink here, but would have preferred black (my local shop was out of stock)
- Liquorice and/or strawberry laces
- A skewer
- A small amount of royal icing in a piping bag

So, to start, we bake the cupcakes in the ice cream cones. I love this method for two reasons, one because you don't need to use a muffin or bun tin, because they stand up by themselves, and two, because the sponge bakes really even inside, without forming a crust on the edges, so it is really soft and light to eat. 
Based on a sponge recipe that calls for equal parts butter, sugar, egg and flour, I found that one egg (approx 54g) and equal of the rest of the ingredients filled 4 cones. For the party, I used 6 eggs, and 330g of the additional ingredients to fill 24 cones. 


Divide the mixture equally between the cones, place on a baking tray lined with a sheet of baking parchment, and bake in the oven at 180 degrees for about 20 minutes, or until the tops are firm to touch. 

Remove from the oven, and set to cool on a cooling rack. At this point use a small pallet knife to remove any overspill or edges from the sponge, so that all the cones are even ready for the microphone top to be iced.
Once the cones are cool, the next step is to make them appear metallic. I used here a Shimmer Spray from Dr Oetker. I found this product easy to use, however you need to make sure that you have covered every available surface with kitchen roll, as the glitter gets everywhere. I used two cans of the spray to cover 24 cones, but to be honest, they would have looked better if they had a third coat as well - you can still see the cone colour through the silver. The cans are quite expensive (£3.99 each) so I would have hoped that they would have stretched further. I also found that once they are coated the silver comes off on your fingers so keep handling to a minimum.

Once the cones are dry to touch, then we ice the top of them. Pipe or spoon buttercream frosting onto the top of the sponge. We will be making a dome shape, but the buttercream can just be applied like the picture. 

Empty the sugar crystals into a bowl and dip the buttercream portion of the cone in. I have to apologise here, I had too many hands full and couldn't photograph the process. 

Anyway, rotate the cone so that the buttercream is completely covered in the sugar crystals. Remove, and use the palm of your hand to to gently cup the top, moulding the frosting and crystals into a dome shape as per the photo. 

I had some issues here getting hold of black sugar crystals. My local cake shop explained that they could order in for me, however I didn't have the luxury of time, so had to settle for silver. Again, I bought two pots, yet they didn't stretch anywhere near as far as I had hoped. I made 12 silver, and then had to make 12 in pink as I had some in my cupboard. 


I also added some black edible glitter to the tops of the domes to darken the colour slightly. 

Next step is to create the band around the base of the dome. I used black liquorice on the silver topped cones, and red strawberry laces on the pink topped cones. For the liquorice bands, as I was using quite a thick liquorice so cut shorter lengths, and fixed two bands around each of the cones. You need a small amount of royal icing to 'glue' the liquorice into place. Personally I didn't have time to make up a batch of proper royal icing, so used one on my emergency Dr Oetker Designer Writing Icing bags... ;-)

For the red strawberry laces, because they are a lot thinner, I was able to stick the start of the lace in place and then wind the lace around the cone several times to create a thicker band. 
The final step is to create a 'wire' from the base of the microphone leading to the amp. For this step, we need a skewer, the royal icing, and some short pieces of the liquorice and strawberry laces. 

Using the skewer, carefully make a small hole at the base of the cone. Try to hold the cupcake by the liquorice band here to stop too much of the silver spray rubbing off onto your hands. For the strawberry laces, a single hole from the skewer is perfect, with the thicker liquorice I had to insert the skewer twice to make a wider hole. 


Pipe a small amount of icing into the hole as a glue, and then insert the liquorice into the centre of the cone. This forms the amp wire from the bottom of the microphone. I chose to secure the liquorice up in a slight twist as per the picture with a little blob of icing, but you could equally leave it loose. 

And that's it! A batch of cute little microphone cupcakes, perfect for any music themed party! 


Sunday, 6 January 2013

Useful Tips for Party Planning

Before Christmas I had a call from a very dear friend of mine, who asked if I would cater for his 30th birthday party. Needless to say, with my usual over-exuberance and refusal to say no to anyone I agreed on the spot. He explained he was expecting about 50 people, and left the rest to me. I have to say I found the whole process incredibly rewarding. I spoke to a few people I know who had catered officially in the past, picked up a few tips, and set about planning. 

For someone totally new to the game, these are the best tips I picked up, and are the definite rules I would apply if I were to do a similar event again.

1. Start with a basic calculation of 8 items per person to decide how much food to make.
2. Create a long list of possible items to include. Discuss with the party host, and narrow down to 6 - 8 items.
3. Take into consideration how much storage space you have, whether it is possible to keep food hot or if you need to provide a cold selection. Ensure if you are including cold meats such as chicken that you have the facility to keep refrigerated until as close to the event as possible.
4. Check your figures. I used Tesco online to search for an make a note of the prices of all the ingredients I would need for the event to make sure that everything came within budget. 
5. Plan ahead. Before you start cooking and baking on the day, make a list of everything that needs to be done, and prioritise. For example, I marinaded my chicken and wrapped my pigs in blankets the night before to get a head start on the big day. 
6. If you are including sandwiches, leave these until the absolute last minute possible, so that they stay as fresh as possible.
7. A little garnish goes a long way, sprinkle a little roughly chopped flat leaf parsley across all dishes gives it a professional flourish!

I have to say I was really pleased with the end result. Everything was ready on time, I came in within budget, and there was plenty of food to serve all the party guests - success methinks! 

What are your experiences with party planning? I'd love to hear any tips or examples from you all? 


The Menu:

Brie and Cranberry Tartlets
Feta and Pepper Tartlets
Parmesan and Poppy Seed Twists
Sausage Rolls
'Pigs-in-Blankets'
Mini Cheese and Mustard Scones
Chicken Skewer Selection (Tikka, Chinese Style and Roasted)
Selection of Sandwiches
Tortilla Chips and Salsa

There was of course, an obligatory cake as well! I made this as a special extra, and it was huge! The shirt is 18 inches in depth! I took great care in getting this as accurate as possible, especially as it is the back of the shirt, and doesn't have the Man Utd logo. I was particularly proud of the hand painted Red Devil, and Premiership lions...

Manchester United Football Shirt Cake


Friday, 28 December 2012

The Latest Pantry Door Cake Projects

So my little idea is nearly 4 months old now, and really starting to take shape. I had a look back through some of my first cake designs this week, and can't believe how far they have come on already! My beautiful friends and family have given me so many new and exciting tools and books for Christmas gifts this year, I cannot wait to get back into the kitchen and start baking, and I have some great ideas for 2013.

These are my last few designs of 2012...

1. 30th Birthday Literary Book Stack Cake

Book Cake
This cake was designed a few months ago for the 30th birthday of a friend's brother. The books have been personalised with his favourite titles and authors, and the three books concealed three separate flavoured cakes, one chocolate with dark chocolate ganache, one Victoria sponge, and one lemon.

2. 1st Birthday Butterfly Cake

My first official request 4 months ago! This was for a friend's little girl's first birthday, and I had one remit - Girly! The cake is a lemon sponge, with coloured lemon frosting. The decoration comes from edible gold paint, edible diamonds, and a sprinkling of edible pink glitter. I found the shaped mould on a fantastic site called Baked by Me - www.bakedbyme.net They really are fantastic, I would recommend anyone to check out their wares! 


3. Christmas Cake Project from Cake Decorating Class.

Christmas Cake
As you know I have been attending a sugarcraft class, this is the completed project from the end of the course. I have signed up for next year, and we will be learning orchids and lilies... I can't wait!

4. Panda Cake


This was a little bit of a home experiment, using a mould that came free with a magazine. I used vanilla and chocolate sponge mixtures, and piped the chocolate into the darker areas of the panda, before filling in with vanilla, and then used black and white sugarpaste to cover. The bamboo was made from wafers. 

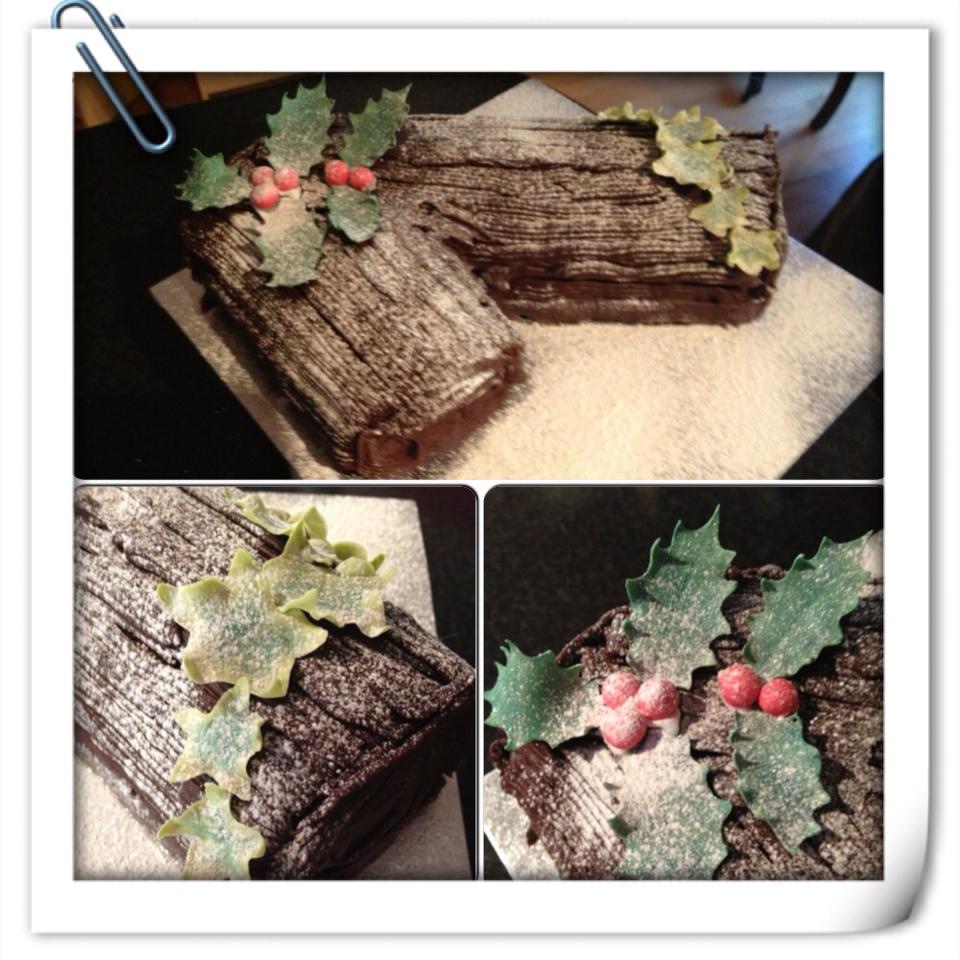
5. Christmas Day Yule Log

And finally. this was the Yule Log I made to take to our big family Christmas dinner, decorated with holly and ivy...


Sunday, 4 November 2012

A Cake for All Occasions

It's Sunday night, and I'm wrapped up in the warm, with a tummy full of Black Forest Gateaux, and the muffled soundtrack of (slightly early) fireworks in the background, and I realise that I haven't posted on here for a couple of weeks. I make no excuse for this, it's been a crazy exhausting few weeks, however I haven't stopped baking, and have advanced my cake decorating skills somewhat. So I thought I would briefly bring you all up to date with the latest creations from The Pantry Door...

First was a gift for two very good friends of mine, who welcomed their second little boy into the world at the beginning of October, and I wanted to mark the occasion. This little lemon cake was decorated with a patchwork quilt, and adorned with teddy bears and little feet, and travelled over 200 miles to be eaten!

Patchwork Quilt Birth of Baby Cake

I have discovered an amazing You Tube channel recently called Cupcake Addiction Tutorials, it's by an Aussie girl who demonstrates the most amazing techniques, and explains them in such an easy and down to earth way. You can find her here http://www.youtube.com/user/mycupcakeaddiction?feature=results_main

I stumbled upon the channel looking for a tutorial on how to make buttercream roses on cupcakes, and found a great how-to to make stiletto cupcakes. Naturally I had to try both out, and these were the results!  


Next up were two actual orders for a friend, who had asked for a cake for Dad's 65th birthday, and then requested an additional cake for a 3 year old boy. After consulting with her, we decided that the Dad cake would be themed around wine, and the little boy's around rockets. Considering my lack of drawing skills, I sketchily tried to explained to her my design ideas, with little support from my illegible doodles. In my minds eye, I had designed a wooden cask shaped cake, draped in grapes, and labelled with the vintage year of her Dad, and a star spangled space cake with a rocket aimed for the moon. I cannot thank her enough for trusting me to bring these ideas to life! The wine cask is a four layered lemon sponge with lemon curd and buttercream, whilst the rocket cake is chocolate with a ganache centre.

'Shoot for the Moon' Rocket Cake


Vintage Red Wine Cask Cake - with Fondant Grapes

Just when I thought I might be able to hang my apron up for a few days, Gary forlornly reminded me that the house had smelled of cake for days, and he hadn't been able to even taste a sample. I had been wanting to test out James Martin's recipe for Cola cake for a while, so decided to use the opportunity, and make a cheeky little cake to tuck into at home...

'Monster-in-a-Box' Cola Cake

I'm off to wash the dishes now! Baking resumes tomorrow night! V x :-)

Monday, 24 September 2012

A Surprise Birthday Meal at The Thatched Cottage, Kingsteignton

Despite the cold and the rain, and it being Monday, I am warmed today by the memory of a great weekend, wonderful company, and good food. Having travelled to Newton Abbot, Devon with Gary to celebrate his Mum's 60th birthday for a surprise even Cilla would have been proud of, I was truly touched to be involved in a celebration that included not only the aforementioned 60th birthday, but two additional family birthdays, and the 61st wedding anniversary of Gran and Grandad.

The venue for the meal was a wonderfully quaint restaurant called The Thatched Cottage, located in Kingsteignton. A beautifully converted 16th century building, the thing that struck me most from the minute we entered was the cosy, welcoming atmosphere that the team have created. Greeted with warm smiles, the staff could not have done more to make sure that the evening ran perfectly.


http://thethatchedcottagerestaurant.com/index.php

As for the food, The Thatched Cottage seem to me to have perfected a balance of the kind of heartwarming homely dishes that suit their setting, with a beautifully professional finish. The end result is absolutely fine dining with none of the pretencion and stuffiness. I left the restaurant feeling like I had spent a relaxed night with family, and yet knowing that the meal had been as special as the occasions we were celebrating.

I guess I do have a second reason to wake with a warm feeling inside this morning as well... The weekend celebrations gave me the perfect opportunity to create the first official Pantry Door cake, and for a newbie I think it came out pretty well - I'll let you all judge for youselves...

V x

Photo: Ok folks, pleased to say that The Pantry Doors first official creation was a success! The secret is out, and here it is! Night all! Xx