Hi! Welcome to my blog. I am a major foodie, with a haphazard cooking philosophy, currently making that transition from cooking and baking for friends and family to 'wonder if I could make this my career'. Follow me for recipes, the outcomes of a few experiments, and general lovely foodiness. Opinions, reviews and recommendations are all my own.
Showing posts with label Dessert. Show all posts

Wednesday, 8 January 2014

Apple and Raspberry Strudel

Apple and Raspberry Strudel

I begin by saying this - please forgive the quality of pictures accompanying this post! They were taken very quickly before we tucked into and ultimately devoured this impromptu strudel, but it tasted so good I just had to share! As you can see, a little of the raspberry juice leaked in the oven, however I am pleased to report despite this there was not a soggy bottom scenario...

After eating a fairly early dinner on Sunday (about 5pm) by 8pm we were a little ready for something sweet. I hadn't planned a dessert, and it's not something that we keep ready to go in the house, so I had a little fumble in the back of the fridge to see what I could produce at short notice. The answer came in a half packet of filo pastry leftover from our Christmas Day starter, and a couple of leftover apples from the braised cabbage from Christmas Dinner - Strudel! Add to the mix a punnet of raspberries lurking in the back of the freezer, and a few spoonfuls of vanilla sugar on the top shelf of the store cupboard, and this tasty, crisp, sweet yet sharp Apple and Raspberry Strudel was born. 

Ingredients

2 large bramley apples
2 tbsp lemon juice
50g unsalted butter, melted
6 sheets ready made filo pastry
170g fresh raspberries
100g caster sugar
1/2 tsp nutmeg
1/2 tsp ground ginger
20g vanilla infused sugar

Method

  • Pre-heat the oven to 180 degrees
  • Peel, core and slice the apples. Place in a large bowl with the lemon juice and toss well. The lemon juice will prevent the apples from browning
  • Lay a sheet of greaseproof paper over a large flat baking tray
  • Place the first sheet of filo flat on the greaseproof paper, and brush over the melted butter
  • Continue to layer up the sheets of filo, brushing the butter between each layer until you have placed the last sheet on (do not brush the top sheet)
  • Add the caster sugar, raspberries, nutmeg and ginger to the apples and mix well with your hands until well combined
  • Bring the prepared filo, with the long edge of the sheets facing you
  • Transfer the fruit mixture onto the filo pastry, spreading out to cover the first third of the pastry. Be sure to leave about an inch on either side of the fruit
  • Fold the short sides over where you left the gap to prevent the filling falling out whilst baking. Then, using the greaseproof paper to support, roll the pastry over to encase the fruit like a cigar, making sure that the strudel sits on the seam of the roll
  • Brush the remaining melted butter over the strudel, and sprinkle the vanilla sugar over 
  • Make a series of slits across the top to allow steam to escape
  • Bake for 20 minutes, until crisp and golden in colour
  • Serve with double cream... or custard... or ice cream - whatever takes your fancy! 


You could of course add any fruit combination here depending what you have available, what is in season, or just what you fancy experimenting with. This dish took about 10 minutes to prep and 20 minutes to bake, and satisfied our sweet craving immensely. Gary even went back for seconds, and there is no higher praise than that! 

As this dish made use of plenty of leftovers, I am linking up to the No Food Waste Challenge, hosted by Elizabeth over at Elizabeth's Kitchen Diary.


Monday, 19 August 2013

No-Bake Amaretto Cheesecake

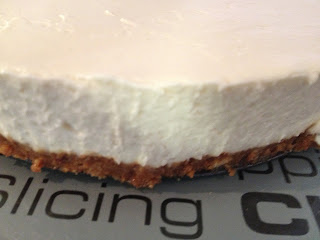
This is a really simple no-bake cheesecake recipe that packs a punch, and tastes so much more complex than it really is. I made this recently for a girly night in, and it went down a storm! Amaretti biscuits and lashings of sweet amaretto liqueur paired with creamy soft cheese work so well together, this creation has gone straight to the top of my favourites list and I will be making this again and again! 


Ingredients

For the base;

200g amaretti biscuits
7 teaspoons amaretto liqueur
50g butter

For the cheesecake filling;

300g cream cheese
50g icing sugar
3 tablespoons amaretto
150ml double cream

Method

First make the biscuit base. Melt the butter in a saucepan over a gentle heat, then set aside. Crush the amaretti biscuits either using a food processor or with a rolling pin.


Add the melted butter and the amaretto and stir through so that all of the biscuit crumbs are evenly coated.


Spread the biscuit mixture into an 8 inch tin (preferably loose bottomed as it will be easier to remove) and press down firmly to form a solid base. Place in the fridge and chill for an hour until set. 


Next make the cheesecake filling. Put the cream cheese, amaretto and icing sugar in a large mixing bowl and beat together. Then add the double cream, and whisk the mixture until combined and the cream has thickened. The mixture should hold a stiff peak. Transfer the cheesecake mixture to the tin with the set base.


Spread the mixture evenly across the base, making sure there are no air pockets. Level the top, and return to the fridge for at least 3 hours to set firm. 


To serve, run a knife around the edge of the tin to release the cheesecake, and remove from the tin. Transfer to a plate to serve. 


This cheesecake is thick, and creamy, with the sweetness coming from the amaretto liqueur instead of too much sugar. The base is more moist than a normal digestive biscuit base due to the structure of the amaretti biscuits and the added amaretto. 

Saturday, 13 July 2013

Amaretto, Chocolate and Raspberry Mousse

This is a quick dessert I knocked up a couple of evenings ago, when Gary and I had a craving for something sweet. It is a simple enough to make chocolate mousse, made a little more sophisticated with the addition of sweet amaretto and sharp raspberries. I used frozen raspberries in this for two reasons, firstly, because the raspberries I had were frozen, but secondly because they are easy to crumble when frozen to sprinkle over the top of the mousse pots. 


Ingredients

100 grams dark chocolate
2 eggs, separated
2 tablespoons amaretto
1/2 tablespoon golden caster sugar
50 grams frozen raspberries


Method

  • Break the chocolate into pieces, place in a heatproof bowl and melt over a bain-marie.
  • Remove the bowl from the heat, and beat in the egg yolks and amaretto until the mixture is smooth and glossy.
  • In a separate bowl, whisk the egg whites until they form stiff peaks. Add the caster sugar and whisk again until the mixture turns glossy. 
  • Add the stiffened egg whites to the melted chocolate mixture in three parts, stir the mixture as little as possible so as not to know out the air, whilst still ensuring that both parts are fully combined. 
  • To assemble, divide the raspberries between four ramekins, reserving a few to decorate the tops of the mousse. 
  • Divide the mousse between the ramekins. Finish by crushing the reserved raspberries, and sprinkling over the top of the mousse. I also added a few white chocolate stars at this point. 
  • Refrigerate for at least 2 hours before serving to give time to set. 

This recipe made 4 decent sized ramekins. We ate one each that night, and the mousse does set well within a couple of hours, however the two we ate the following night however were much firmer, so if you can make these in advance then do. Either way, I promise that they won't last long!