Hi! Welcome to my blog. I am a major foodie, with a haphazard cooking philosophy, currently making that transition from cooking and baking for friends and family to 'wonder if I could make this my career'. Follow me for recipes, the outcomes of a few experiments, and general lovely foodiness. Opinions, reviews and recommendations are all my own.
Showing posts with label Sponge Cake. Show all posts

Friday, 28 June 2013

Mini Swedish Princesstarta

This cake has been on my 'to-bake' list ever since Lucy at Supergolden Bakes and I ogled some snaps of it over on Pinterest. I decided it was going to be my bake for the April meeting of the Chesterfield Clandestine Cake Club, as the theme was Happy Birthday Your Majesty, but alas I couldn't make the event. It was then going to be my bake for the June meeting, when the theme was Cakes from Around the World, but once again life (or more specifically work) got in the way. 


This month, the Tea Time Treats challenge is Layer Cakes, whilst the Calender Cakes challenge is Pump Up The Jam, and as both of these challenges end today, and I was damned if I was going to miss another opportunity to bake this amazing cake, I grabbed a mixing bowl as soon as I got in last night, and didn't stop whisking until these beautiful mini Swedish Princesstartas were sat on the table in front of me. Now all I have to do is write up the recipe before the end of today... Let's hope I don't get distracted! 


A Swedish Princesstarta is traditionally made of layers of sponge, jam, pastry cream, and domed whipped cream and covered with a pale green marzipan. I have combined my go-to recipes for each of the above components, but I did scale everything down here to make two smaller cakes, as with the fresh cream elements it won't keep as long as a normal cake. If you wanted to make this as a celebration cake (for which it would be perfect) just double up all the quantities and use an 8 inch cake pan for a stunning centrepiece. 

Ingredients (makes 2 small cakes)

For the Sponge
  • 60 grams salted butter
  • 60 grams golden caster sugar
  • 1 egg
  • 60 grams self-raising flour
  • 1 tablespoon milk
For the Pastry Cream
  • 1 egg yolk
  • 25 grams vanilla sugar (or caster sugar and vanilla extract)
  • 2 teaspoons cornflour
  • 110 grams full fat milk
To Assemble
  • 2 tablespoons Strawberry Jam (I used Mackay's Strawberry Preserve)
  • 4-5 fresh strawberries
  • 300ml double cream, whipped
  • 300 grams marzipan
  • green and pink gel food colours
Method

First, make the sponge cake. Pre-heat the oven to 160 degrees, and line two 5'' cake tins. Cream together the butter and sugar until light and fluffy. Add the egg and beat well. Sift in the flour, and gently fold into the mixture until combined, then add the milk, and fold again to loosen the mixture. Divide the mixture between the two prepared tins, and bake for 15-20 minutes or until the sponge is firm to touch. Remove from the oven, and place on a cooling rack.

Whilst the cake is baking, make the pastry cream. Place the egg yolk, sugar and cornflour in a bowl, and whisk until smooth and silky. Heat the milk in a saucepan until just warm. Remove from the heat, and add to the egg mixture slowly, whisking continuously. Once all the milk has been added, return to the saucepan, and heat over a low heat, continuing to whisk the mixture until it thickens to a custard. Remove from the heat, transfer to a bowl, and set aside to cool to room temperature, then place in the fridge to cool completely. Stir occasionally to prevent a skin from forming. 

Once the cake and the pastry cream are completely cool, you can assemble the Princesstarta as follows;

Take a serrated knife, and slice each cake horizontally to create two layers. 

Spread a tablespoonful of strawberry jam on each of bottom layers.

Add a layer of chopped fresh strawberries.


Divide the pastry cream between the two cakes.


Place on the top layer of the sponge.


Use a pallet knife to use a little of the whipped cream to seal in the edges of the filling, then heap the rest on top of the two cakes.


Take the marzipan, and reserve a little (about 20g) to make the traditional rose decoration. Colour the remainder with the green food colouring. Divide the green marzipan into two equal portions, roll each out to around 5mm thick, and use to cover the Princesstarta, smoothing the tops to shape the cream underneath to a dome shape.


Trim the edges to remove an excess marzipan, and tuck the cut edges under the cake for a neat finish. 


Decorate with a pink marzipan rose (tutorial to follow) and a dusting of icing sugar. 


Store in the fridge, serve chilled, and consume within two days.


I am linking this recipe up with Tea Time Treats, hosted by Karen from Lavender and Lovage and Kate from What Kate Baked as the theme is Layer Cakes, of which this little beauty has plenty!!


I am also linking with Calender Cakes, hosted by Rachel of Dolly Bakes and Laura of Laura Loves Cakes, where the theme this month is Pump Up The Jam. 


Friday, 28 December 2012

The Latest Pantry Door Cake Projects

So my little idea is nearly 4 months old now, and really starting to take shape. I had a look back through some of my first cake designs this week, and can't believe how far they have come on already! My beautiful friends and family have given me so many new and exciting tools and books for Christmas gifts this year, I cannot wait to get back into the kitchen and start baking, and I have some great ideas for 2013.

These are my last few designs of 2012...

1. 30th Birthday Literary Book Stack Cake

Book Cake
This cake was designed a few months ago for the 30th birthday of a friend's brother. The books have been personalised with his favourite titles and authors, and the three books concealed three separate flavoured cakes, one chocolate with dark chocolate ganache, one Victoria sponge, and one lemon.

2. 1st Birthday Butterfly Cake

My first official request 4 months ago! This was for a friend's little girl's first birthday, and I had one remit - Girly! The cake is a lemon sponge, with coloured lemon frosting. The decoration comes from edible gold paint, edible diamonds, and a sprinkling of edible pink glitter. I found the shaped mould on a fantastic site called Baked by Me - www.bakedbyme.net They really are fantastic, I would recommend anyone to check out their wares! 


3. Christmas Cake Project from Cake Decorating Class.

Christmas Cake
As you know I have been attending a sugarcraft class, this is the completed project from the end of the course. I have signed up for next year, and we will be learning orchids and lilies... I can't wait!

4. Panda Cake


This was a little bit of a home experiment, using a mould that came free with a magazine. I used vanilla and chocolate sponge mixtures, and piped the chocolate into the darker areas of the panda, before filling in with vanilla, and then used black and white sugarpaste to cover. The bamboo was made from wafers. 

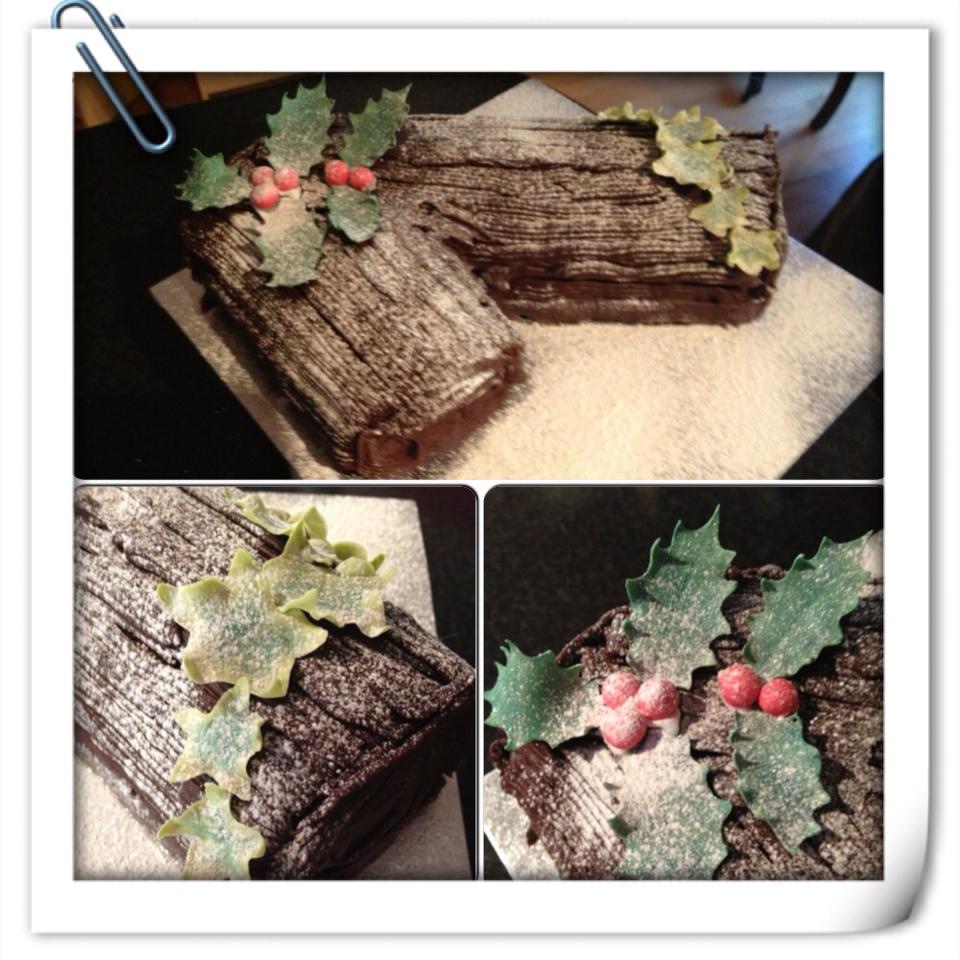
5. Christmas Day Yule Log

And finally. this was the Yule Log I made to take to our big family Christmas dinner, decorated with holly and ivy...


Sunday, 11 November 2012

Cake School Progress Update

Back in September I signed up to a 10 week course in sugarcraft and cake decorating, run by the Worker's Educational Association (WEA) in Sheffield. I found the company by searching for cake decorating courses online, and they have been brilliant, they run all kinds of courses, you can check them out at www.wea.org.uk

I'm halfway through the course now, and the more I learn, the more I fall in love with cake decorating - which is a big deal for me considering just how short my attention span is! We have completed our first project, started a Christmas themed one, and I am already saving up to enrol on the next course.

For project one, we had to make a small arrangement of roses and carnations. As we were all beginners, we had to learn everything from the start, how use flower paste, how to colour it, shape it, and keep it from drying out. The arrangement we were making was held on wires, and over the week we have built up the components, as they have to dry between each element added.

Step One: Creating Stems and Buds
Step Two: Leaves
Step Three: First Layer of Petals
Step Four: Second Layer of Petals

The Completed Arrangement!
I never expected working with sugar paste could be so rewarding, and the possibilities are seemingly limitless. Working with flower paste is such a delicate task, however the results are amazing, and look so realistic! The flowers are totally edible, however we are taught to be careful about the wires in arrangements such as the one above, and advise 'clients' not to eat them.

I had a great opportunity to try a design with sugarcraft flowers last week when a friend asked me to make a birthday cake for her Mum. After looking at a few options, we decided to create a Cherry Blossom design on a Victoria Sponge cake. I have to say that the internet does provide a wealth of ideas for cake designs, and if you have a basic idea of something you want to achieve, you can get some really good inspiration online. I would add a note of caution however not to carbon copy designs you find online, as many professional cake decorators are very protective over the intellectual property rights of their designs.

Anyway, the idea I came up with was a simple, yet elegant ivory iced cake, with royal iced branches, and shaped cherry blossoms scattered across the surface.

Cherry Blossom Victoria Sponge Cake
I was particularly proud of the fondant icing on this cake, as I have struggled a little getting the icing smooth and even so far. I think I have now mastered the theory behind it, a few more practise attempts needed though I think before I can be totally confident. I suppose that means I have to make some more cakes... it's a hard life! ;-)

Vx

Saturday, 10 November 2012

A Fond(ant) Trip Down Memory Lane

There are often things that you remember with a fondness, that, when you experience them again never quite live up to the memory. I remember French Fancies as a special treat, something that you only got at birthday parties, as they were too special for everyday. The only acceptable version was Mr Kipling's and oh! what a treat they were. Soft sponge cake, the sugar sweet iced coating, and the creamy buttercream topping. And so, I hope you understand my disappointment when I chanced upon these little beauties a few weeks ago, and with a now heightened sense of nostalgia, found the sponge to be mass produced and flavourless, the vegetable oil buttercream lacking, and the fondant icing overpoweringly sweet. 


I decided that this weekend's Saturday Experiment should be to try and recreate my childhood favourites, and set about the task in earnest this morning. I started out the way I often do these days - google, and found a range of recipes, which varied in their execution. I started by making a simple sponge cake for the centre, using my preferred method. I use a tip from an old friend, and measure out my eggs first, and then match the weight of butter, sugar and flour to them. Once all the ingredients are combined, I personally like to add a splash of milk to the batter to loosen it, as I find this makes a moister sponge when cooked. 

Once the cake was cooked and cooled, I sliced it into one inch squares, and topped each square with a blob  of buttercream. (Real, made with butter buttercream for that matter!) 

Now came the tricky part, coating each fancy with fondant icing. The trick I discovered, by trial and error, is getting the consistency of the icing just so, that it is fluid enough to move the sponge in easily to get the coating, but stiff enough so as it sets on the sponge rather than run straight off when on the cooling rack. Trust me, the whole process is a sticky, gooey, kitchen annihilating mess, saved only by a Mary Berry tip I read about securing the sponge pieces on a fork when coating in the fondant. 

The end result, although not as neat and uniform as Mr Kipling's I admit, I was really pleased with. The sponge is moist and buttery, the icing not as thick, and therefore not as over-powering. All in all, not bad for a first attempt, and enough to rekindle my love affair with Fondant Fancies. I just need a cup of tea now to wash them down! :)

Lilac Fondant Fancies